Audiovox D1718 Owners Manual
Audiovox D1718 - DVD Player - 7 Manual
 |
UPC - 044476039874
View all Audiovox D1718 manuals
Add to My Manuals
Save this manual to your list of manuals |
Audiovox D1718 manual content summary:
- Audiovox D1718 | Owners Manual - Page 1
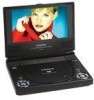
D1718 PORTABLE 7" LCD MONITOR AND DVD PLAYER - Audiovox D1718 | Owners Manual - Page 2
these features will only function when the vehicle is in "park" or when the vehicle's parking brake is applied. An LCD panel or video monitor used for television reception, video or DVD play that operates when the vehicle is in gear or when the parking brake is not applied must be installed - Audiovox D1718 | Owners Manual - Page 3
include a 7" Screen (16:9 Aspect Ratio) Liquid Crystal Display (LCD) monitor and a DVD player. The unit applies the latest state of the art electronics and is designed for use in hotels, offices home or vehicle. The unit is constructed to provide years of reliable, trouble-free service, and is - Audiovox D1718 | Owners Manual - Page 4
with the discs. C. Contents 1. 1 x 2. 1 x 3. 1 x 4. 1 x 5. 1 x 6. 1 x 7. 1 x 7'' LCD Monitor & DVD Player Combo AC to DC Adapter Remote Control w/Battery (CR2025) Instruction Manual Audio/Video Cable DC Power Adapter Rechargeable Battery Pack D. Powering and installation 1. Powering the system - Audiovox D1718 | Owners Manual - Page 5
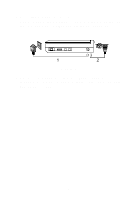
2. Powering the system in a car Plug one end of the DC power adapter into the DC 9V jack on the unit, then plug the other end into the lighter socket. Figure 1 3. Powering the system with rechargeable Battery Please refer to Rechargeable Battery Installation and Use (Pages 32 and 33). 5 - Audiovox D1718 | Owners Manual - Page 6
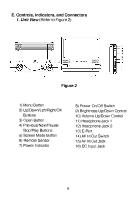
Figure 2 1) Menu Button 2) Up/Down/Left/Right/OK Buttons 3) Open Button 4) Previous/Next/Pause/ Stop/Play Buttons 5) Screen Mode Button 6) Remote Sensor 7) Power Indicator 8) Power On/Off Switch 9) Brightness Up/Down Control 10) Volume Up/Down Control 11) Headphone Jack 1 12) Headphone Jack 2 13 - Audiovox D1718 | Owners Manual - Page 7
.The unit will load the disc and start playing. d. Rotate the BRIGHTNESS and VOLUME controls to adjust the LCD's brightness and the DVD player's volume. e. To stop playing a disc, press STOP. f. To turn off the DVD player, slide the POWER ON/OFF to OFF. The DVD player's POWER indicator turns off. 7 - Audiovox D1718 | Owners Manual - Page 8
the SETUP Menu and the unit will resume it's last playback mode. Figure 4. Main SETUP Menu Screen 1) Press "Setup", the 'GENERAL SETUP PAGE' will display on screen. Figure 5. General SETUP Menu Screen a).Select TV DISPLAY using the DOWN button, and then press RIGHT to enter the submenu. Select - Audiovox D1718 | Owners Manual - Page 9
with a black strip at both the top and bottom of the screen. * WIDE: When the player is connected to a wide screen TV, a wide picture is shown on the full screen. Figure 6. TV DISPLAY Screen Display b).Select 'ANGLE MARK' using the DOWN buttton, and then press the RIGHT button to enter the submenu - Audiovox D1718 | Owners Manual - Page 10
(off) *NOTE: The DVD player will enter the Screen Saver mode after approximately five minutes if the same image remains on the screen. d). Select " Last Memory" by using the DOWN button. Figure 9. LAST MEMORY Screen Display *ON: The unit will return to the last position on the disc. *OFF: The unit - Audiovox D1718 | Owners Manual - Page 11
press "Enter"again to return the main Menu. Figure 11. BRIGHTNESS Screen Display b).Select "Contrast" by using the UP or DOWN buttons,then adjust the Contrast by pressing the LEFT or RIGHT butttons. Figure 12. CONTRAST Screen Display To exit "Contrast" Setting, press "Enter"again to return to the - Audiovox D1718 | Owners Manual - Page 12
can adjust the Saturation by pressing the LEFT or RIGHT buttons. Figure 14. SATURATION (Color) Screen Display To exit "Saturation" Setting, press "Enter"again to return to the main Menu 3).With no disc inside the player, select "password" using the LEFT or RIGHT buttons, then press the ENTER button - Audiovox D1718 | Owners Manual - Page 13
Figure 17. PASSWORD VERIFY Input Screen Display NOTE: The Default Password is 3308. This in another area and delete it from this manual. Some discs can be limited depending on the age of users while some discs cannot. 4).With no disc inside the player select 'PREFERENCES' using the LEFT or RIGHT - Audiovox D1718 | Owners Manual - Page 14
to return. Figure 20. Preference DISC MENU LANGUAGE Note: Language and subtitle selection is only available for discs that are recorded in the above listed languages. If the selected, language is not available, the player will play and display on the screen the original recorded language contained - Audiovox D1718 | Owners Manual - Page 15
'PARENTAL' using the DOWN button, then press RIGHT to enter the submenu. Figure 21. PARENTAL Preference Screen Display Select the parental level you desire using the UP or DOWN buttons for discs with lock-out function or multiple rating levels. These are listed from the lowest level (1 Kid Safe - Audiovox D1718 | Owners Manual - Page 16
1. Basic Operation POWER OPEN PLAY PAUSE STOP NEXT PREVIOUS FORWARD REVERSE LEFT/RIGHT/UP/DOWN ENTER NUMBERS RETURN MENU REPEAT A-B DISPLAY ANGLE SUBTITLE AUDIO ZOOM SETUP Turn the unit on/off Remove/load the disc Start Play/Execute item or setting Still Picture (1 time) Stop at the present playing - Audiovox D1718 | Owners Manual - Page 17
appear on the screen of your TV or Monitor. The contents of the menu vary from disc to disc. Press MENU during playback to display the menu. Some DVDs only allow you to select disc playback options using the DVD root menu. 3. DISPLAY (Display contents vary from disc to disc.) 1. PLAYING TIME AND - Audiovox D1718 | Owners Manual - Page 18
will disappear automatically in 3 seconds. Figure 25. Chapter Elapsed Time Screen Display d. Press 'DISPLAY' a 4th time to display the Remaining seconds. 2. ANGLE During playback of a disc, press 'ANGLE' to display the available angles for discs containing multi-angles*, with the current angle - Audiovox D1718 | Owners Manual - Page 19
Figure 27. Angle Screen Display 3. SUBTITLE During disc playback press 'SUB' to select the subtitle language you desire*, with the current if the 'SUB' button is not pressed again within 3 seconds. Figure 28. Subtitle Screen Display * Some DVDs only allow access to this function through the - Audiovox D1718 | Owners Manual - Page 20
display will disappear automatically if the 'AUDIO' button is not pressed within 3 seconds. Figure 29. Audio Language Screen Display * Some DVDs only allow access to this function through the DVD menu. 5. ZOOM During playback press 'ZOOM' to enlarge the picture by 2x, 3x or 4X with the current - Audiovox D1718 | Owners Manual - Page 21
the Starting Point A. Figure 31. A-B Repeat Starting Point Screen Display b.Press 'A-B' a second time to set the Ending Point B and the player will repeatedly play the part between Point A and Point B. Figure 32. A-B Repeat Ending Point Screen Display c. Press A-B a third time to cancel A-B repeat - Audiovox D1718 | Owners Manual - Page 22
'REPEAT' once to repeatedly play the current chapter. Figure 34. Chapter Repeat ON Screen Display b.During playback press 'REPEAT' again to repeatedly play the current title. Figure 35. Title Repeat ON Screen Display c. During playback press 'REPEAT' a 3rd time to repeat all Chapters and Titles - Audiovox D1718 | Owners Manual - Page 23
you what information is available using this function. a. The current track and playing time of that track will be displayed on the screen. Figure 38. SINGLE ELAPSED Screen Display b. Press 'DISPLAY' one time and SINGLE REMAIN appears along with the current track playing and the amount of time left - Audiovox D1718 | Owners Manual - Page 24
total time that the CD has been playing. Figure 40. TOTAL ELAPSED Screen Display d. Press 'DISPLAY' three times and TOTAL REMAIN appears along with the current : • TRACK- repeats the track that is playing. • ALL- repeats the disc that is playing. • OFF As you toggle through the options, the repeat - Audiovox D1718 | Owners Manual - Page 25
folder) Insert an MP3 CD, the DVD player will initialize the disc and the directory (folder) will be shown on the TV screen. Figure 42. MENU Screen Display When an MP3 disc is inserted into the unit, the menu screen appears automatically. You can use the menu screen to change folders and songs. The - Audiovox D1718 | Owners Manual - Page 26
Use the ( NEXT ) button to move to the next song. Press the (PREVIOUS) button to move to the beginning of the previous song. USING THE REPEAT FEATURE The default mode for the Repeat feature is OFF. Pressing REPEAT consecutively changes the repeat options: • REPEAT ONE • REPEAT FOLDER • REPEAT OFF - Audiovox D1718 | Owners Manual - Page 27
6. Playing JPEG file 1) Load the JPEG Disc into tray. 2) Select JPEG file by pressing "UP/DOWN" button. 3) You can mode below. a. Press "display" first time, "WIPE TOP" will display on the screen, the picture will refresh from top to bottom. b. Press "display" 2nd time, "WIPE BOTTOM" will display on - Audiovox D1718 | Owners Manual - Page 28
to browse the JPEG file, "SLIDE SHOW" "MENU" will display on the screen. 9) When browsing the picture, press "Stop" and thumbnail size picture will be to Out. b. Connect one end of the supplied audio/video adapter cable (1/8" ) plug into the unit's DVD's AV jack, and connect the other end to the AV - Audiovox D1718 | Owners Manual - Page 29
or Camcorder. ( Refer to Figure 44) a. Slide the AV In/Out switch to In. b. Connect one end of the supplied audio/video adapter cable (1/8") plug into the unit's DVD's AV jack, and connect the other end to the AUDIO OUTPUT jacks on your Game or Camcorder through an optional RCA cable (white - Audiovox D1718 | Owners Manual - Page 30
1) Optional Game Controller ( Refer to Figure 45) Please refer to the operation manual provided with the Game Controller. Figure 45 *Note: Do not use the "AV Jack" and "E Port" at the same time when in "AV IN" mode. Unplug the game controller when using the A/V input jack. 30 - Audiovox D1718 | Owners Manual - Page 31
Compatible DISC: DVD/CD/MP3 Signal system: NTSC Panel size: 7 inch Frequency response: 20 Hz to 20 kHz Video output: 1 Vp-p/75 Ohm, unbalanced Audio output: 1.4Vrms/10kOhm Audio S/N: Better than 60 dB Dynamic range : Better than 85 dB Laser: Semiconductor Laser, Wave Length: 650 nm/795 nm Power - Audiovox D1718 | Owners Manual - Page 32
you may remove the wall plug and stop charging. Using and Maintaining your Rechargeable Batteries 1. Please make sure you always use only the AC adapter included with the player to recharge your batteries. 2. Recharge efficiency will degrade when environmental temperatures drop below 50oF (10oC) or - Audiovox D1718 | Owners Manual - Page 33
: 1. First, make sure the player is off and that the AC power supply has been disconnected. 2. Close the player cover. 3. Align the battery pack pins with the holes on the rear of the unit. 4. Push the battery towards the rear of player until it locks into position. The lock position is indicated - Audiovox D1718 | Owners Manual - Page 34
, to correction of antenna problems, to costs incurred for installation, removal or reinstallation of the product, or to damage to digital memory/media devices, gaming devices, discs, speakers, accessories, or electrical systems. This Warranty does not apply to any product or part thereof which, in - Audiovox D1718 | Owners Manual - Page 35
© 2007 Audiovox Electronics Corporation 128-7998
-
 1
1 -
 2
2 -
 3
3 -
 4
4 -
 5
5 -
 6
6 -
 7
7 -
8
-
9
-
10
-
11
-
12
-
13
-
14
-
15
-
16
-
17
-
18
-
19
-
20
-
21
-
22
-
23
-
24
-
25
-
26
-
27
-
28
-
29
-
30
-
31
-
32
-
33
-
34
-
35
 |
 |
D1718
PORTABLE 7" LCD MONITOR AND DVD PLAYER