Audiovox D1718ES User Guide - Page 5
C. Contents, D. Powering and installation - car adapter
 |
UPC - 044476039898
View all Audiovox D1718ES manuals
Add to My Manuals
Save this manual to your list of manuals |
Page 5 highlights
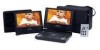
C. Contents 1. 1 x 7'' LCD Monitor & DVD Player Combo 2. 1 x 7" LCD Monitor 3. 2 x AC to DC Adapter 4. 1 x Remote Control with battery (CR2025) 5. 1 x Instruction Manual 6. 1 x AV Adapter Cable (One to Three Female) 7. 1 x AV Adapter Cable (One to Three Male) 8. 1 x Y Type DC Power Adapter 9. 1 x Rechargeable Battery 10. 1 x Mounting Bag With Straps for the Monitor 11. 1 x Carry Bag With Straps D. Powering and installation 1. Powering the system indoors (Refer to Figure 1) Plug one end of the AC to DC adapter into the DC 9V jack on the right side of the main unit, then plug the other end into a 120V AC power outlet. The monitor can also be powered in the same manner. 2. Powering the system in a car (refer to Figure 2) Plug one end of the DC power adapter into the DC 9V jack on the main unit, then plug the other end into the vehicle power socket. Single Monitor Main Unit Figure 1 5
-
 1
1 -
 2
2 -
 3
3 -
 4
4 -
 5
5 -
 6
6 -
 7
7 -
 8
8 -
 9
9 -
 10
10 -
 11
11 -
12
-
13
-
14
-
15
-
16
-
17
-
18
-
19
-
20
-
21
-
22
-
23
-
24
-
25
-
26
-
27
-
28
-
29
-
30
-
31
-
32
-
33
-
34
-
35
-
36
-
37
-
38
 |
 |
