Audiovox D1812PKG Owners Manual - Page 6
C. Contents, D. Powering and installation, - ac dc adapter
 |
UPC - 044476028007
View all Audiovox D1812PKG manuals
Add to My Manuals
Save this manual to your list of manuals |
Page 6 highlights
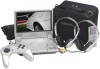
C. Contents 1. 1 x 8'' LCD Monitor & DVD Player 2. 1 x AC to DC Adapter 3. 1 x Remote Control with battery (CR2025) 4. 1 x Instruction Manual 5. 1 x Audio/Video Adapter Cable 6. 1 x DC Power Adapter 7. 1 x Rechargeable Battery 8. 1 x Y Connector (for headphones) 9. 2 x Wired headphones 10. 1 x Bag W/ Straps 11. 1 x Game Controller D. Powering and installation 1. Powering the system indoors (Refer to Figure 1) Plug one end of the AC to DC adapter into the DC 9V jack on the left side of the main unit, then plug the other end into the 120V AC power outlet. 2. Powering the system in a car (refer to Figure 1) Plug one end of the DC Power adapter into the DC 9V jack on the unit, then plug the other end into the vehicle power outlet. Figure 1 6
-
 1
1 -
 2
2 -
 3
3 -
 4
4 -
 5
5 -
 6
6 -
 7
7 -
 8
8 -
 9
9 -
 10
10 -
 11
11 -
 12
12 -
13
-
14
-
15
-
16
-
17
-
18
-
19
-
20
-
21
-
22
-
23
-
24
-
25
-
26
-
27
-
28
-
29
-
30
-
31
-
32
-
33
-
34
-
35
-
36
-
37
-
38
-
39
-
40
-
41
-
42
-
43
-
44
-
45
-
46
-
47
 |
 |

6
C. Contents
1. 1 x 8’’ LCD Monitor & DVD Player
2. 1 x AC to DC Adapter
3. 1 x Remote Control with battery (CR2025)
4. 1 x Instruction Manual
5. 1 x Audio/Video Adapter Cable
6. 1 x DC Power Adapter
7. 1 x Rechargeable Battery
8. 1 x Y Connector (for headphones)
9. 2 x Wired headphones
10. 1 x Bag W/ Straps
11. 1 x Game Controller
D. Powering and installation
1. Powering the system indoors
(Refer to Figure 1)
Plug one end of the AC to DC adapter into the DC 9V jack on the
left side of the main unit, then plug the other end into the 120V
AC
power outlet.
2. Powering the system in a car
(refer to Figure 1)
Plug one end of the DC Power adapter into the
DC 9V jack on the
unit, then plug the other end into the vehicle power outlet.
Figure 1