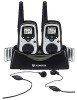
Audiovox GMRS90102CH Owners Manual - Page 11
External Microphone MIC/Speaker SPK/CHG Jack 6
 |
View all Audiovox GMRS90102CH manuals
Add to My Manuals
Save this manual to your list of manuals |
Page 11 highlights
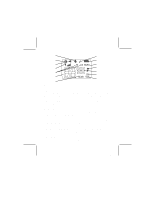
Push To Talk (PTT) Button (4) Pressing and holding this button will allow you to speak to any transceiver that is set to the same channel and privacy code setting as yours. Hold the transceiver approximately 1 to 2 inches from your face as you speak into the built in microphone (9). After you have finished speaking, release the PTT Button to allow reception of incoming signals. It is not possible to transmit and receive at the same time. The Transmit Signal Level indicator ( ) will display the relative strength of the transmitted signal. When receiving an incoming signal, the BUSY icon will appear in the upper right quadrant of the display. The PTT button can also be used as a two-way call ringer. Pressing the button twice quickly will call another party on the same channel. Up Channel/Volume Button (10) In the standby mode, pressing this button will increase the listening volume. When in function edit mode this button will be used to adjust the unit's settings. Down Channel/Volume Button (11) In the standby mode, pressing this button will decrease the listening volume. When in function edit mode this button will be used to adjust the unit's settings. Mode Button (12) This button is used to select the various feature settings in the GMRS/FRS or Weather band modes. Holding the MODE button longer than 2 seconds will toggle between the GMRS/FRS and Weather band modes. External Microphone (MIC)/Speaker (SPK)/(CHG) Jack (6) This jack accepts the supplied Audiovox Earbudt/microphone connector, or the optional Charging Adapter connector. For additional optional equipment and accessories for the GMRS9010-2 visit the Audiovox web site at www.audiovox.com. Scan/VOX Button (14) Press this Button momentarily to enable or disable the scan mode. Press and hold the button for more than 2 seconds to enable or disable the VOX 11 128-7032A 11 of 28
-
 1
1 -
2
-
3
-
4
-
5
-
 6
6 -
 7
7 -
 8
8 -
 9
9 -
 10
10 -
 11
11 -
 12
12 -
 13
13 -
 14
14 -
 15
15 -
 16
16 -
17
-
18
-
19
-
20
-
21
-
22
-
23
-
24
-
25
-
26
-
27
-
28
 |
 |
