Audiovox VBP4000 Owners Manual - Page 29
Using MONITOR PORT - video cable
 |
UPC - 044476006265
View all Audiovox VBP4000 manuals
Add to My Manuals
Save this manual to your list of manuals |
Page 29 highlights
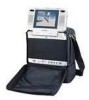
I. Wired Headphone (Refer to Figure 14) Optional wired headphones may be used with the "Video In a Bag" System. Simply plug in the headset to either headphone 1 or 2 jack on the left side of the monitor. NOTE: Using headphone jack #1 will disconnect the internal speakers. J. Support Monitors 1. Using MONITOR PORT (Refer to Figure 14 and Figure 15) Besides the monitor combined with the main unit, this system can drive up to 2 additional monitors (Please contact an Audiovox dealer for the additional monitors) by using the cigarette lighter adapter in the vehicle. (NOTE: The AC adapter can drive only 1 main unit and 1 monitor either combined or detached). Connect the PORT on the additional monitor to either MONITOR 1 port or MONITOR 2 port on the left side of the main unit with the supplied DIN cable. After plugging in the main unit, DC 12V power, Audio/ Video and IR signals will all be supplied through DIN cable to the additional monitor. Figure 15 29
-
 1
1 -
2
-
3
-
4
-
5
-
6
-
7
-
8
-
9
-
10
-
11
-
12
-
13
-
14
-
15
-
16
-
17
-
18
-
19
-
20
-
21
-
22
-
23
-
 24
24 -
 25
25 -
 26
26 -
 27
27 -
 28
28 -
 29
29 -
 30
30 -
 31
31 -
 32
32
 |
 |
