Audiovox VM9214 User Manual - Page 18
Source Menu - adapters
 |
View all Audiovox VM9214 manuals
Add to My Manuals
Save this manual to your list of manuals |
Page 18 highlights
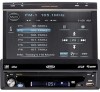
VM9214 Source Menu You can also use the touch screen to change the source through the SOURCE MENU. To access the SOURCE MENU, touch the top left corner of the screen or press the SRC button on the front panel (10) or remote control (8). RADIO SOURCE MENU RADIO BT DISC N WE S NAV USB1 USB2 AUX CAMERA Touch the RADIO, DISC, USB1, USB2, BT, NAV, AUX or CAMERA button to select the corresponding source. NOTE: If an iPod is attached to a USB1 port, "IPOD" appears instead of the text "USB1." External Devices External peripheral devices, including a game console, camcorder, navigation unit, iPod, Zune, etc. can be connected to this unit via RCA output using an A/ V Media Adapter Cable (not included). EJECT A/V INPUT 1 Right Audio 2 Left Audio 3 Ground 4 Video 3.5mm A/V Cable (not included) Connect the external device to the A/V Media Adapter Cable and then plug the cable into the A/V INPUT connector (13) on the front of the radio. Select "AUX" or "AUX IN" (when monitor is closed) mode to access auxiliary devices. You cannot directly control external devices connected to the A/V INPUT. For 15
-
 1
1 -
2
-
3
-
4
-
5
-
6
-
7
-
8
-
9
-
10
-
11
-
12
-
 13
13 -
 14
14 -
 15
15 -
 16
16 -
 17
17 -
 18
18 -
 19
19 -
 20
20 -
 21
21 -
 22
22 -
 23
23 -
24
-
25
-
26
-
27
-
28
-
29
-
30
-
31
-
32
-
33
-
34
-
35
-
36
-
37
-
38
-
39
-
40
-
41
-
42
-
43
-
44
-
45
-
46
-
47
-
48
-
49
-
50
-
51
-
52
-
53
-
54
-
55
-
56
-
57
-
58
-
59
-
60
-
61
-
62
-
63
-
64
-
65
-
66
-
67
-
68
-
69
-
70
-
71
-
72
-
73
-
74
-
75
-
76
-
77
-
78
-
79
-
80
-
81
-
82
-
83
-
84
-
85
-
86
-
87
-
88
-
89
-
90
-
91
-
92
-
93
-
94
-
95
-
96
-
97
-
98
-
99
-
100
-
101
-
102
-
103
-
104
-
105
-
106
-
107
-
108
-
109
-
110
-
111
-
112
-
113
-
114
-
115
-
116
-
117
-
118
-
119
-
120
-
121
-
122
-
123
-
124
-
125
-
126
-
127
-
128
-
129
-
130
-
131
-
132
-
133
-
134
-
135
-
136
-
137
-
138
-
139
-
140
-
141
-
142
-
143
-
144
-
145
-
146
-
147
-
148
-
149
-
150
-
151
-
152
-
153
-
154
-
155
-
156
-
157
-
158
-
159
-
160
-
161
-
162
-
163
-
164
-
165
-
166
-
167
-
168
-
169
-
170
-
171
-
172
-
173
-
174
-
175
-
176
-
177
-
178
-
179
-
180
-
181
-
182
-
183
-
184
-
185
-
186
-
187
-
188
-
189
-
190
-
191
-
192
-
193
-
194
-
195
-
196
-
197
-
198
-
199
-
200
-
201
-
202
 |
 |
