Audiovox XMRVRFM002 User Guide
Audiovox XMRVRFM002 - Commander MT XM Radio Tuner Manual
 |
UPC - 044476039577
View all Audiovox XMRVRFM002 manuals
Add to My Manuals
Save this manual to your list of manuals |
Audiovox XMRVRFM002 manual content summary:
- Audiovox XMRVRFM002 | User Guide - Page 1
CommanderMT System user guide XMRVRFM002 - Audiovox XMRVRFM002 | User Guide - Page 2
you want it. XM® is America's #1 Satellite Radio provider with over 4 million customers. Your Audiovox CommanderMT XM® System includes all of the components needed to install and enjoy XM radio in your vehicle. Required subscription for service sold separately. Installation costs and other fees - Audiovox XMRVRFM002 | User Guide - Page 3
approved by XM® Satellite Radio, Inc. can void the user's authority to operate this device. Please note that the CommanderMT System comes equipped with an FM direct hardwire solution for professional installation. By adhering to these warnings and safety considerations, stated in the manual and by - Audiovox XMRVRFM002 | User Guide - Page 4
Display Controller Features ...13 Power On/Off ...13 Channel Up/Down Buttons (Remote Control) ...15 CommanderMT Commander Channel Scroll Wheel ...15 Select (XM) Button Direct Tune On/Off Enable ...26 Search Mode ...27 Manual/Scanning Category Search ...28 Channel Skip/Add ...29 Tune Select Mode ...30 - Audiovox XMRVRFM002 | User Guide - Page 5
...50 Preset (A, B, C) ...51 Display Button-Screen Presentation ...52 Jump Button ...55 Remote Control Unit ...55 System Power Down ...58 Warning Display Messages ...58 Notification/Progress Display Messages ...59 Care and Cleaning ...59 Troubleshooting ...60 Specifications ...61 Warranty ...62 - Audiovox XMRVRFM002 | User Guide - Page 6
23 24 CommanderMT System Components ...10 XM® Preview Channel (#1) Display ...11 Channel "0" Radio ID Display ...12 Receiver 8-Character Alphanumeric ID ...12 CommanderMT Controls and Indicators ...14 CommanderMT Active Channel Screen ...14 XM® and Audiovox Power On Logo Display ...18 Menu Options - Audiovox XMRVRFM002 | User Guide - Page 7
7 List of Illustrations List of Illustrations (Cont) 25 26 27 28 29 30 31 32 33 34 35 36 37 38 39 40 41 42 43 44 45 46 47 48 49 50 Skip/Add Menu Display ...29 Skip Selected Channel Display ...30 Add Selected Channel Display ...30 Tune Select Menu Display ...31 Select by Song Confirmation Display - Audiovox XMRVRFM002 | User Guide - Page 8
and Artist Plus Song Title in Large Font ...54 Channel Number and Name Plus Scrolling Artist and Song Title in Large Font ...54 CommanderMT System Remote Control Unit ...56 System Power Down Display ...58 Warning Display Messages ...58 Notification/Progress Display Messages ...59 - Audiovox XMRVRFM002 | User Guide - Page 9
signals received by an externally mounted antenna for your vehicle. The CommanderMT System recognizes and decodes the incoming XM® program information and provides an audio signal to your radio or other audio output equipment. NOTE: When installed in a vehicle, the XM signal can be received - Audiovox XMRVRFM002 | User Guide - Page 10
System Components CommanderMT System Components menu 1 2 3 4 5 6 7 8 9 p/d 0 XM Mini-Tuner ^ CommanderMT Display Controller Interconnect Cradle ^ Remote Control FM Direct Adapter XM Car Antenna DIN Opening Trim Bezel Snap-On Mounting Plate 12 Vdc Power Cable Figure 1. CommanderMT System - Audiovox XMRVRFM002 | User Guide - Page 11
, and the XM® Satellite Radio service has been activated as follows: 1. Set up your Audiovox CommanderMT System using the installation instructions included in your CommanderMT installation guide, or with the help of a professional installer. NOTE: The antenna must be installed on the outside - Audiovox XMRVRFM002 | User Guide - Page 12
ID code as shown in Figure 4 below: Figure 4. Receiver 8-Character Alphanumeric ID NOTE: No adjustments are allowed in this mode. To exit the Radio ID screen, tune to any channel using the Channel Scroll Wheel, or the Up ( ∧) or Down ( ∨ ) buttons on the remote control, and press the Select button. - Audiovox XMRVRFM002 | User Guide - Page 13
CommanderMT Display Controller Features The Audiovox CommanderMT Display Controller provides 8 control buttons, five of which are integrated with the scroll wheel, plus number buttons 0 through 9. (See Figure 5.) Power On/Off: When the Power( ) button on the Commander or Remote Control is pressed - Audiovox XMRVRFM002 | User Guide - Page 14
14 Getting Started/CommanderMT Display Controller Features jump Button LCD Display Select Button Infrared (IR) Sensor display Button Power Button Channel Scroll Wheel ^ ^ Category Select Buttons menu 1 2 3 4 5 6 7 8 9 p/d 0 Preset/Direct Tune Button menu - Audiovox XMRVRFM002 | User Guide - Page 15
Up/Down Buttons (Remote Control): CommanderMT Channel Scroll Wheel: The channel scroll wheel provides Commander control for navigating up and up (CW), respectively, through the various menus and lists. Select (XM) Button: During normal operation, the Select button, when pressed momentarily, is - Audiovox XMRVRFM002 | User Guide - Page 16
has been made, it can be entered by pressing the Select button. On the remote control, the category search function is implemented using the > and < buttons, channel Up/ . Display Button: The display button allows the user to choose one of five ways to present the Artist, Song Title and channel - Audiovox XMRVRFM002 | User Guide - Page 17
Menu Button: The menu button is used to access MENU options which allow the user to make feature function adjustments to suit his/her personal preferences. Upon entering the main menu . Basic Operation With the unit properly installed and connected to your vehicle audio system, proceed as follows: - Audiovox XMRVRFM002 | User Guide - Page 18
prior to turnoff. (See Figure 7.) Basic Operation/Menu Options ! Check ANTENNA ! Check ANTENNA Figure 7. XM® and Audiovox Power On Logo Display 2. Rotate the scroll wheel, or use the channel up/down buttons on the remote control to select the desired channel, or use the category buttons to - Audiovox XMRVRFM002 | User Guide - Page 19
seconds from the previously selected function, the unit exits the menu screen function and reverts to the default screen display. FM Frequency This feature allows the user to select an FM Transmitter frequency or turn the FM transmitter Off when the receiver is used with the vehicle kit. If you are - Audiovox XMRVRFM002 | User Guide - Page 20
transmitter will be Off by default. To turn the FM transmitter on, rotate the scroll wheel or press the channel up/down buttons on the remote control to highlight the desired fre quency (88.1, 88.3, 88.5,...107.9) and press the Select button. (See Figure 10.) To exit this function, press the menu - Audiovox XMRVRFM002 | User Guide - Page 21
the channel up/down buttons on the remote control for frequency selection. Press the Select button to enter the new frequency setting (Figure 11), or press the menu button to return to the FM frequency page with no change to frequency. PRESS XM - Audiovox XMRVRFM002 | User Guide - Page 22
is now in effect. ROTATE DIAL TO SELECT FM frequency 88.1 MHz Figure 12. Changing the FM Frequency Display Brightness and Contrast This feature allows the user to adjust the LCD backlight brightness and contrast of the display. When the menu list is entered, FM Frequency is highlighted; rotate - Audiovox XMRVRFM002 | User Guide - Page 23
15 seconds, the unit will exit the adjustment mode. PRESS XM BUTTON TO SELECT Brightness Contrast - + + Figure 14. Set Brightness Screen Contrast Mode: Rotate the scroll wheel CW, or press the channel up button on the remote control to enter the Contrast mode; the entire Contrast graph will be - Audiovox XMRVRFM002 | User Guide - Page 24
feature allows the user to adjust the level of the audio output signal when the FM frequency modulator is on or off. This menu option is entered when the menu button is pressed and the scroll wheel is rotated CW, or the channel up button is pressed on the remote control the remote control to - Audiovox XMRVRFM002 | User Guide - Page 25
25 Menu Options/FM Audio Level AUDIO LEVEL SET FM Audio Level Set Figure 16. FM Audio Level Set Display FM Off (Line Out): When the FM modulator is disabled, upon entering the audio level mode, a horizontal bar graph depicting Line Out audio in 6 steps is displayed with a + sign on the right and - Audiovox XMRVRFM002 | User Guide - Page 26
Figure 19, with Direct Tune On highlighted. The screen prompts you to rotate the scroll wheel or press the channel up/down buttons on the remote control to activate or deactivate the direct tune mode. Once the desired state is achieved, press the Select button. ROTATE DIAL TO CHANGE Direct Tune On - Audiovox XMRVRFM002 | User Guide - Page 27
, the top banner of the display prompts you to PRESS XM BUTTON TO SELECT as shown in Figure 21. DIRECT TUNE SET Direct Tune is search mode menu option allows you to find a particular channel by using manual category search or by automatically scanning the various categories. Upon entering the - Audiovox XMRVRFM002 | User Guide - Page 28
Manual/Scanning Category Search: When the Search mode screen appears, Search by Category or Search by Scanning is highlighted; if you wish to change the current setting, rotate the scroll wheel or press the channel up/down buttons on the remote control prompts you to PRESS XM BUTTON TO SELECT as - Audiovox XMRVRFM002 | User Guide - Page 29
until the Select button is pressed to confirm the selection. PRESS XM BUTTON TO SELECT Search by Category Search by Scanning Figure 24. on the remote control to access the channel skip/add feature. The skip/add menu display appears as shown in Figure 25. To select a specific channel you wish - Audiovox XMRVRFM002 | User Guide - Page 30
press the channel up/down buttons on the remote control to highlight the skipped channel; then press - sign is replaced with a + sign. (See Figure 27.) PRESS XM BUTTON TO SKIP - The 40s + The 50s + The 60s 4 Display Tune Select Mode This feature allows the user to store current program information (Artist - Audiovox XMRVRFM002 | User Guide - Page 31
tone. When the exact Artist or Song is detected on another XM channel, the user will be notified via a confirmation tone. An alert will also activate the select by song alert feature, rotate the scroll wheel CW or press the channel up button on the remote control to highlight Select by Song; then - Audiovox XMRVRFM002 | User Guide - Page 32
. Typical Select by Artist/Song Confirmation Display Select by Artist:To activate the select by artist alert feature, rotate the scroll wheel CW or press the channel up button on the remote control to highlight Select by Artist; then press the Select button; the Select by artist confirmation screen - Audiovox XMRVRFM002 | User Guide - Page 33
/Song Titles: To activate the Erase All/Erase Some artist/song titlefeatures, rotate the scroll wheel or press the channel up/down buttons on the remote control to highlight Erase All or Erase Some; then press the Select button; when selected, the Erase All? screen appears with a No - Audiovox XMRVRFM002 | User Guide - Page 34
the selection; the top banner will then prompt you to press the XM button to select. Once selected, the display screen indicates that the artist has been erased, thereby canceling the tune select mode. When the Erase Some feature is selected, a list of the Artists or Song Titles is presented on - Audiovox XMRVRFM002 | User Guide - Page 35
or song title you wish to erase and press the Select button as instructed in the top banner of the display screen. The artist is erased scroll wheel or press the channel up/down buttons on the remote control to access the stock ticker feature. The add/erase stock menu display appears as shown in - Audiovox XMRVRFM002 | User Guide - Page 36
Erase Some Stocks Display Screen Erase All/Erase Some Stocks: To activate the Erase All/Erase Some stock features, rotate the scroll wheel or press the channel up/down buttons on the remote control to highlight Erase All or Erase Some; then press the Select button; the Erase All? screen appears with - Audiovox XMRVRFM002 | User Guide - Page 37
, thereby canceling the Stock Ticker mode. When the Erase Some feature is selected, a list of the stocks is presented on the display as shown in Figure 38. Highlight the stock you wish to erase and press the Select button as instructed in the top banner of the display screen. The stock is - Audiovox XMRVRFM002 | User Guide - Page 38
/Stock Ticker Mode Add Stocks: To activate the Add Stocks feature, rotate the scroll wheel or press the channel up/down buttons on the remote control to highlight Add Stocks on the display as shown in Figure 35; then press the Select button as instructed in the top banner of the screen. The display - Audiovox XMRVRFM002 | User Guide - Page 39
Note: Only certain stock symbols are accepted; further attempts to enter a stock of choice not recognized by the receiver are automatically rejected. The XM Mini-Tuner will sometimes complete the entry. When the entry appears on the screen, press the Select button to confirm the symbol. To exit - Audiovox XMRVRFM002 | User Guide - Page 40
Added Figure 43. Stock Symbol Added Display Info Extras This feature allows you to display the available Information Extras, primarily sports the scroll wheel or press the channel up/down buttons on the remote control to choose the desired sport of interest. Then press the Select button. - Audiovox XMRVRFM002 | User Guide - Page 41
the channel up/down buttons on the remote control to highlight the desired team; then press the Select button to confirm. A + sign indicates the team is selected, while a - sign indicates the team is not selected. (See Figure 46.) To select or de-select a specific team, rotate the scroll wheel or - Audiovox XMRVRFM002 | User Guide - Page 42
the remote control up/down buttons to highlight the setting you wish to adjust; then press the Select button to confirm the selection. ROTATE DIAL TO CHANGE Scrolling Display Background Mode Figure 47. Display Screen Mode Scrolling Display: The Scrolling Display feature allows the user to program - Audiovox XMRVRFM002 | User Guide - Page 43
/Off Display Screen DISPLAY SCREEN MODE Scrolling is On Figure 49. Scrolling On Confirmation Display Screen Background Mode: The Background Setting feature allows the user to change the color of the characters being displayed to white characters on black (Negative Display) or black characters on - Audiovox XMRVRFM002 | User Guide - Page 44
the remote control up/down buttons to highlight either Negative Display or Positive Display then press the Rotary/Select Knob or the Remote's (XM) This feature allows you to personalize the clock display. The clock data is provided via the XM signal, and is displayed according to the users settings - Audiovox XMRVRFM002 | User Guide - Page 45
/24 Hour Daylight Savings Figure 52. Set Clock Display Screen Time Zone: This feature is used to set the clock to the Time Zone in which the you reside. (See Figure 53.) Use the scroll wheel or the remote control up/down buttons to highlight the desired time zone; then press the Select - Audiovox XMRVRFM002 | User Guide - Page 46
12:31 Figure 54. Time Zone Confirmation Display 12/24 Hour Selection: This feature is used to set the time displayed to either a 12hour (Default) or 24-hour format. (See Figure 55.) Use the scroll wheel or the remote control up/down buttons to highlight either 12 Hour Clock or 24 Hour Clock - Audiovox XMRVRFM002 | User Guide - Page 47
47 Menu Options/Set Clock Daylight Savings Time Selection: This feature allows you to enable or disable Daylight Savings Time. (See Figure 57.) Use the scroll wheel or the remote control up/down buttons to highlight either Standard or Daylight Savings, then press the Select button. Acceptance is - Audiovox XMRVRFM002 | User Guide - Page 48
to turn the unit back on. This feature allows the user to program the receiver to automatically turn on when power to the unit is reapplied (much like a vehicle radio). When in the Auto-On menu, use the scroll wheel or the remote control up/down buttons to highlight the On or Off option. (See - Audiovox XMRVRFM002 | User Guide - Page 49
feature allows the user to reset the Mini-XM receiver back to the original factory settings. Upon entering the Factory Default mode, use the scroll wheel or the Channel Up/Down buttons on the remote control on the screen. All of the presets installed by the user are erased and the unit returns to the - Audiovox XMRVRFM002 | User Guide - Page 50
Menu/Preset/Direct Exit Menu To exit the menu options mode, rotate the scroll wheel CW, or press the down button on the remote control to highlight -Exit Menu-. Press the Select button to confirm the selection. Preset / Direct (p/d) The p/d button determines whether the numbered buttons 0 through - Audiovox XMRVRFM002 | User Guide - Page 51
51 Preset Direct Enter Ch Number 25- Figure 62. Direct Channel Entry Display Preset (A, B, C): The unit has the capability of storing three sets of 10 preassigned channels for a total of 30 preassigned channels. To assign a channel to a number button, press the p/d button to choose the preset - Audiovox XMRVRFM002 | User Guide - Page 52
52 Display Button - Screen Presentation Display Button - Screen Presentation The display button allows the user to choose one of five ways to present the Artist, Song Title and Channel information on the LCD screen. The default screen is the primary - Audiovox XMRVRFM002 | User Guide - Page 53
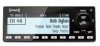
53 Display Button - Screen Presentation A-2 DECADES 12:15 CH 4 The 40s Mel Torme You're Driving Me Crazy Figure 64. Channel Number and Name Plus Artist and Song Title A-2 THE 40S 12:15 CH 4 Mel Torme You're Driving Me Crazy Use Menu to Add Stock Symbols Figure 65. Channel Number and - Audiovox XMRVRFM002 | User Guide - Page 54
54 Display Button - Screen Presentation A-2 THE 40S 12:15 CH 4 Mel Torme You're Driving Me Crazy Figure 67. Channel Number and Artist Plus Song Title in Large Font A-2 DECADES 12:15 CH 4 The 40s H a r r yJ a m e s / T w oO ' C l o c k Figure 68. Channel Number and Name Plus Scrolling - Audiovox XMRVRFM002 | User Guide - Page 55
most of the features from a remote location. Each button on the remote control functions in the same way as the button on the Commander unit. For a full description of a keypad button or function refer to the preceding sections in this manual. For optimal operation of the remote control, always aim - Audiovox XMRVRFM002 | User Guide - Page 56
56 Remote Control Unit Figure 69. CommanderMT System Remote Control Unit 7 1 9 56 3 4 2 1 - Audiovox XMRVRFM002 | User Guide - Page 57
57 Remote Control Unit 1. >/< : Used to access categories in ascending and descending order. 2. select : Used to confirm selection in various lists and menus. 3. jump : Used to switch between the previous and current channel. 4. display : Allows the user to choose one of three ways of presenting - Audiovox XMRVRFM002 | User Guide - Page 58
the CommanderMT System is turned off when the power ( ) button is pressed; the XM logo appears on the display for 2 seconds, after which it fades to black (Figure that the ! specific No SIGNAL event is present or remains active. ! No SIGNAL ! Check ANTENNA Figure 71. Warning Display Messages - Audiovox XMRVRFM002 | User Guide - Page 59
Care And Cleaning · Keep the unit away from excessive moisture or where it may get wet. · It is strongly recommended that the unit be installed and kept away from heat sources or direct sunlight. · When cleaning, use only a soft, dry cloth. · Never use any chemicals, abrasives, solvents, alcohol - Audiovox XMRVRFM002 | User Guide - Page 60
modulator frequency contains static. Vehicle Antenna is not connected to the radio. NOTE: If you are utilizing the Wireless FM Modulator feature and the problem persists, it is recommended that the optional FM Direct Adapter is installed (Part # XMFM-1). NO SOUND XM CHANNELS YOU SUBSCRIBED TO ARE - Audiovox XMRVRFM002 | User Guide - Page 61
61 Specifications Specifications Audio Output (100-250 ohms): 1.5V RMS Maximum Power Supply: 12 Volt, Negative Ground, DC Input. Display Controller Dimensions (W x H x D): 115mm x 45mm x 20.5mm (Including scroll wheel) (4.5" x 1.77" x 0.80" ) Weight 3.8 Ounces (with cable) - Audiovox XMRVRFM002 | User Guide - Page 62
Radio XMRVRFM002 AUDIOVOX sale), specification accessories, or electrical systems. Warranty does not apply to malfunction of satellite transmissions, repeater signals or audio systems or to damage caused by poor installation of included components such as magnetic roof mount antenna, disiplay control - Audiovox XMRVRFM002 | User Guide - Page 63
Company any liability other than expressed herein in connection with the sale of this product. Some states do not allow limitations on how This Warranty gives you specific legal rights and you may also have other rights which vary from state to state. U.S.A.: Audiovox Electronics Corporation 11788 - Audiovox XMRVRFM002 | User Guide - Page 64
Audiovox Electronics Corporation 150 Marcus Blvd. Hauppauge, New York 11788 U.S.A. 1 800 645 4994 www.audiovox.com XM name and related logos are trademarks of XM Satellite Radio Inc. Printed on Recycled Paper ©2007 Audiovox Electronics Corporation. All rights reserved. XMRVRFM002
-
 1
1 -
 2
2 -
 3
3 -
 4
4 -
 5
5 -
 6
6 -
 7
7 -
8
-
9
-
10
-
11
-
12
-
13
-
14
-
15
-
16
-
17
-
18
-
19
-
20
-
21
-
22
-
23
-
24
-
25
-
26
-
27
-
28
-
29
-
30
-
31
-
32
-
33
-
34
-
35
-
36
-
37
-
38
-
39
-
40
-
41
-
42
-
43
-
44
-
45
-
46
-
47
-
48
-
49
-
50
-
51
-
52
-
53
-
54
-
55
-
56
-
57
-
58
-
59
-
60
-
61
-
62
-
63
-
64
 |
 |

user guide
XMRVRFM002
Commander
MT
System