Avanti BCT115J1B-IS Instruction Manual - Page 13
Operating Your Appliance
 |
View all Avanti BCT115J1B-IS manuals
Add to My Manuals
Save this manual to your list of manuals |
Page 13 highlights
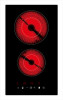
Ø CONTROL PANEL OPERATING YOUR APPLIANCE 1 Control Panel Lock Button 6 2 Front Burner Selector Button 7 3 Reduce / Decrease ( - ) Button 8 4 Timer Selector Button 9 5 Add / Increase ( + ) Button 10 POWER ON / OFF BUTTON Push this button to turn the cooktop power on or off, Rear Burner Selector Button Power ON / OFF Button Rear Burner Control Display Timer Control Display Front Burner Control Display BURNER SELECTOR BUTTONS (FRONT BURNER / REAR BURNER) Press the appropriate button for the desired burner. Once pressed the burner display will show the default setting ( 5 = Medium), adjust to the desired cook temperature using the ( - ) or ( + ). The temperature setting ranges from 0 - 9. The setting will blink or flash in the display indicating it is in setting mode. Once you have selected the desired temperature simply press the button for the selected burner or leave the control panel alone for approximately for 3 seconds, the setting will stop blinking in the display window. Example of comparable temperature ranges: 0 1 - 2 3 - 4 No Heat Low Heat Medium Low Heat 5 - 6 Medium Heat 7 - 8 Medium High Heat 9 High Heat AUTOMATIC SHUT OFF TIMER Press to set a pre-set cook time, press the Timer button and then set the desired cook time using the ( - ) or ( + ) buttons. The default time is 10 minutes. Press the button for the desired burner (front or rear), then select the desired cook temperature setting using the ( - ) or ( + ) buttons. Press the timer button (10 will appear in the display window as 10 minutes is the default), set the desired cook time by pressing the ( - ) or ( + ) buttons (time ranges between 0 - 99 minutes). The ( • ) next to the temperature setting in each window will turn on to indicate the timer has been set for that burner. Once set, the unit will automatically shut off after the cook time has expired. HOT SURFACE INDICATOR After the burner is used and turned off, the display will flash ( H ) to warn that the surface is still hot. Once the burner and surface has cooled down the ( H ) indicator will turn off automatically. Each burner will show the ( H ) warning respectively. 13
-
 1
1 -
2
-
3
-
4
-
5
-
6
-
7
-
 8
8 -
 9
9 -
 10
10 -
 11
11 -
 12
12 -
 13
13 -
 14
14 -
 15
15 -
 16
16 -
 17
17 -
 18
18 -
19
-
20
-
21
-
22
-
23
-
24
-
25
-
26
-
27
-
28
-
29
-
30
-
31
-
32
-
33
-
34
-
35
-
36
-
37
-
38
-
39
-
40
-
41
-
42
-
43
-
44
-
45
-
46
-
47
-
48
 |
 |
