Avanti FFBM102D2P Instruction Manual - Page 9
This Will Improve The Operations Of The Refrigerator Under
 |
View all Avanti FFBM102D2P manuals
Add to My Manuals
Save this manual to your list of manuals |
Page 9 highlights
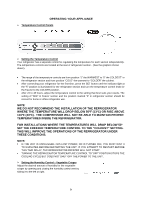
OPERATING YOUR APPLIANCE Temperature Control Panels Setting the Temperature Control Your refrigerator has a separate control for regulating the temperature for each section independently. The temperature controls are located at the rear of refrigerator section. (See the graphics shown above). • The range of the temperature controls are from position "1" the WARMEST to "5" the COLDEST" in the refrigerator section and from position "COLD" the warmest to "COLDER" the coldest. • After connecting your refrigerator for the first time, press the SET button until the indicator light at the "5" position is illuminated for the refrigerator section and turn the temperature control knob for the freezer to the COLDER position. • After 24 to 48 hours, adjust the temperature control to the setting that best suits your needs. The setting of "MID" in freezer section and the position marked "3" in refrigerator section should be correct for home or office refrigerator use. NOTE: WE DO NOT RECOMMEND THE INSTALLATION OF THE REFRIGERATOR WHERE THE TEMPERATURE WILL DROP BELOW 50ºF (13ºC) OR RISE ABOVE 110ºF (43ºC). THE COMPRESSOR WILL NOT BE ABLE TO MAINTAIN PROPER TEMPERATURES INSIDE THE REFRIGERATOR. FOR INSTALLATIONS WHERE THE TEMPERATURES WILL DROP BELOW 50º SET THE FREEZER TEMPERATURE CONTROL TO THE "COLDEST" SETTING. THIS WILL IMPROVE THE OPERATIONS OF THE REFRIGERATOR UNDER THESE CONDITIONS. NOTE: IF THE UNIT IS UNPLUGGED, HAS LOST POWER, OR IS TURNED OFF, YOU MUST WAIT 3 TO 5 MINUTES BEFORE RESTARTING THE UNIT. IF YOU ATTEMPT TO RESTART BEFORE THIS TIME DELAY, THE REFRIGERATOR-FREEZER WILL NOT START. TURNING THE REFRIGERATOR TEMPERATURE CONTROL TO "OFF" POSITION STOPS THE COOLING CYCLE BUT DOES NOT SHUT OFF THE POWER TO THE UNIT. Setting the Humidity Control - Vegetable Crisper Adjust the desired amount of humidity for the vegetable crisper by opening and closing the humidity control vent by sliding it to the left or right. 9
-
 1
1 -
2
-
3
-
 4
4 -
 5
5 -
 6
6 -
 7
7 -
 8
8 -
 9
9 -
 10
10 -
 11
11 -
 12
12 -
 13
13 -
 14
14 -
15
-
16
-
17
-
18
-
19
-
20
-
21
-
22
-
23
-
24
-
25
-
26
-
27
-
28
-
29
-
30
-
31
-
32
-
33
-
34
-
35
-
36
 |
 |
