Avanti WCP13-IS Instruction Manual - Page 10
When Dispensing Or Cleaning The Unit, Be Sure To Have The Dispensing
 |
View all Avanti WCP13-IS manuals
Add to My Manuals
Save this manual to your list of manuals |
Page 10 highlights
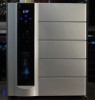
Setting up the Wine Dispenser Assembly Start by removing the Argon gas regulator from the shelf by removing the tie-wraps. The gas hose (rear hose) should be connected for you by the factory but in the event the hose is not connected to the regulator, simply insert the end of the hose into the pressure coupler, this will create the seal necessary to allow the flow of gas into the dispensing assembly. Holding the regulator firmly in one hand, insert the threaded neck of the Argon gas cartridge into the regulator and turn clockwise until the regulator pin pierces the cartridge (you will hear a slight hiss noise), continue until the cartridge is secured and there is a good seal (no longer hissing). Hang the regulator on the shelf as shown on the drawing with the hose to the left of the regulator as shown in Fig. 2. Fig. 1 •Uncork the bottle of wine you want to dispense and insert the hose from the dispensing assembly. •Insert the bottle neck into the dispenser assembly until it is secure. Do not turn the bottle or dispenser assembly as a snug fit is all that is needed. •For standard sized bottles, place the spacer pad below the bottle and raise the bottle height screw by turning it counter-clockwise until the neck of the bottle is secure and sealed into the dispenser assembly. *** DO NOT OVERTIGHTEN *** Fig. 2 ** FOR LARGER SIZED BOTTLES, DO NOT USE THE SPACER PAD WHEN ADJUSTING THE HEIGHT OR PLACING THE BOTTLE INTO THE DISPENSER Fig 3 ASSEMBLY. Test the installation by dispensing a 1 ounce portion of wine. CAUTION WHEN DISPENSING OR CLEANING THE UNIT, BE SURE TO HAVE THE DISPENSING NOZZLE INSIDE THE RECEIVING GLASS OR CUP TO AVOID SPLASH OR SPLATTER. NOTE: When the dispensed volume is low or slow to dispense, check the gas and replace the cartridge. If this occurs after a large amount of wine has been dispensed, allow the gas pressure to normalize and try again. If you have recently dispensed large amounts of wine, the gas pressure has not normalized. Allow the gas pressure in the bottle to normalize and retry to dispense. (Normally 3 - 5 minutes, depending on the amount of liquid in the bottle and the amount of gas left in the cartridge). WARNING: Replacing the Argon gas cartridge. Before removing the empty Argon gas cartridge ensure that all of the pressure has been released by pulling upward on the manual pressure release valve. (Fig. 1) If there is no gas released, proceed to remove the cartridge. If there is gas or pressure released hold the valve open until all gas is released before removing the cartridge. 10
-
 1
1 -
2
-
3
-
4
-
 5
5 -
 6
6 -
 7
7 -
 8
8 -
 9
9 -
 10
10 -
 11
11 -
 12
12 -
 13
13 -
 14
14 -
 15
15 -
16
-
17
 |
 |
