Axis Communications 214 PTZ 214 PTZ Netzwerkkamera - Installationsanleitung - Page 3
AXIS 214 PTZ Network Camera Installation Guide, Package Contents, Ceiling mounting
 |
View all Axis Communications 214 PTZ manuals
Add to My Manuals
Save this manual to your list of manuals |
Page 3 highlights
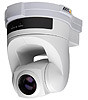
AXIS 214 Installation Guide Page 3 ENGLISH AXIS 214 PTZ Network Camera Installation Guide Please observe the following before installing the AXIS 214 PTZ Network Camera. • This product is designed for indoor use or in locations where it is protected from rain and moisture. To operate the camera in outdoor conditions, use the outdoor housing accessories. • Whether the camera is in use or not, the AXIS 214 must always be positioned where it is not exposed to direct sunlight or strong halogen light, which can cause permanent damage to the camera's image sensor. Damage as a result of exposure to strong light is not covered by the Axis warranty. • Do not use strong or abrasive detergents when cleaning the casing. Use a mild detergent and wipe gently. Package Contents Item PTZ Network Camera Power adapter Ceiling bracket kit Retaining wire Connector block CD Printed Materials Notes AXIS 214. The adapter is country-specific. 2 brackets, 6 mounting screws. Safety wire. Green 4-pin I/O terminal connector block. Documentation and software. AXIS 214 Installation Guide, Axis Warranty Document. Ceiling mounting If the AXIS 214 is to be mounted on a ceiling, it is recommended that you set the IP address and get the camera up and running before finally mounting it. The AXIS 214 PTZ Network Camera is supplied with 2 brackets for ceiling mounting. 1. Using appropriate screws (not supplied), attach the ceiling bracket (A) to a junction box, as shown here. Use the screw slots for easy positioning. Attach the retaining wire if required. Retaining wire Junction box in ceiling Hole for cables Ceiling bracket (A) Alternatively, attach the bracket directly to the ceiling, using the 4 screw holes in the centre of the bracket. These screws are not supplied. Front of camera Screw holes for direct attachment to ceiling
-
 1
1 -
 2
2 -
 3
3 -
 4
4 -
 5
5 -
 6
6 -
 7
7 -
 8
8 -
 9
9 -
10
-
11
-
12
-
13
-
14
-
15
-
16
-
17
-
18
-
19
-
20
-
21
-
22
-
23
-
24
-
25
-
26
-
27
-
28
-
29
-
30
-
31
-
32
-
33
-
34
-
35
-
36
-
37
-
38
-
39
-
40
-
41
-
42
-
43
-
44
 |
 |
