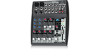
Behringer 1002B Manual - Page 7
Gain Setting
 |
View all Behringer 1002B manuals
Add to My Manuals
Save this manual to your list of manuals |
Page 7 highlights
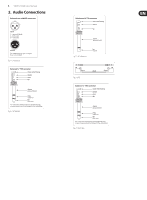
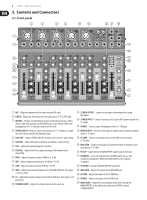
7 XENYX 1002B User Manual 3.2 Rear panel (28) (29) (28) AC POWER IN - Connect the mains power cable into this input. 4.1 Using external effects (29) POWER ON - Turns the mixer's power on and off. 4. Gain Setting It is very important to set each channel's GAIN knob correctly in order to get the maximum amount of signal headroom and least amount of noise possible. Setting the GAIN too low could make that channel too quiet to mix properly, while setting it too high will cause clipping and distortion. Stereo channels 3/4, 5/6 and 7/8 allow the MIC and LINE inputs to be used in parallel thanks to the dedicated GAIN knobs for each input. Follow these instructions to set the gain for each channel and situation: The 1002B lets you use external effects processors to add a touch of reverb, delay, or other effects to various channels. Use the channel FX knobs, FX SEND knob and FX SEND jack to send a portion of the signal from several channels to an effects processor. You can insert the "wet" signal back into the mix through one of the stereo channels. The FX signal from each channel is sent "post-fader," meaning that as you change the channel's volume, you also change how much of that channel's signal is sent to the effects processor. This ensures that the mix of wet and dry signal remains the same as you adjust the channel volume. Follow these steps to incorporate external effects in your mix: • Connect a ¼" TS cable from the FX SEND jack to the input of the effects processor • Plug the audio source into the channel input (XLR or ¼") • If you would like the effects to operate in stereo, connect ¼" cables from the • Sing into the microphone or play the line-level source at the volume you will ultimately use during recording or performance. If you set the gain for a left and right outputs of the processor to one of the stereo input channels on the 1002B vocal mic by saying "check" into it, this gain setting will probably not be as • For mono operation, most processors return a mono signal through the loud as the actual vocal performance. Setting the gain this way will lead you left output. This mono signal should then be routed into the left input on to set the gain too high, which may cause the extra loud vocal performance one of the mixer channels. If possible, use channel 9/10 since it only allows to overload and distort. Likewise, if checking a mic that will record a line inputs saxophone, make sure the performer plays close to the mic while setting the gain. For keyboards, do not change the output volume of the keyboard • Turn the FX SEND knob to the center (12 o'clock) position after the mixer's gain has been set • Turn the channel FX knob up for each source to which you would like to apply • Turn the GAIN knob clockwise until the red CLIP LED lights up. This means the channel has begun to overload (too much signal is allowed in) effects. For example, you can add a lot of reverb to a vocal mic, while only adding a small amount to a snare drum. This will just be a preliminary setting as you will not be able to hear the effect yet. Keep the knobs around • Turn the GAIN knob counterclockwise a small amount, then sing or play the center position; you will fine-tune them shortly again. Ideally, the GAIN knob should be set as high as possible while allowing the CLIP LED to only light occasionally, if at all • Adjust the input gain for the channel receiving the output from the effects processor. (See the Gain Setting section for details.) If you must use both the MIC and LINE inputs on channels 3/4, 5/6, or 7/8, you can adjust the gain setting for each source individually thanks to the dedicated GAIN knobs. The channel fader affects the level of both sources, so achieving a good balance between the 2 inputs can be tricky. • Turn the channel fader up to 0 on the channel receiving the signal back from the processor. DO NOT turn the FX knob on that channel up at all! Your sound system will become haunted with screaming banshees • Set the gain for the MIC input using the GAIN MIC as described above • You should now hear the selected effect on the channels that are sending signal to the processor. Adjust the channel FX knobs to get the effect mix • Set the gain for the LINE input(s) using the GAIN LINE as described above just right • Both GAIN knobs share the same CLIP LED, so when both sources are in use at • NOTE: The processor will likely have its own VU meters to monitor the the same time, neither input should cause the LED to light. If this happens, incoming signal level. If the processor's meter begins clipping, turn down the turn each GAIN knob down one at a time to determine which is overloading FX SEND knob on the 1002B • Raise the channel fader so that both sources are audible in the overall mix. See the Applications section for details. Ideally, they will already be balanced and not require further adjustment • If one source is too quiet with the fader turned up, turn the louder source's GAIN knob down a bit, then raise the fader to the appropriate level. DO NOT simply turn the quiet source's GAIN knob up until it is loud enough, as this will likely cause clipping and distortion
-
 1
1 -
 2
2 -
 3
3 -
 4
4 -
 5
5 -
 6
6 -
 7
7 -
 8
8 -
 9
9 -
 10
10 -
 11
11 -
 12
12
 |
 |
