Behringer COMPRESSOR/LIMITER CL9 Manual - Page 1
Behringer COMPRESSOR/LIMITER CL9 Manual
 |
View all Behringer COMPRESSOR/LIMITER CL9 manuals
Add to My Manuals
Save this manual to your list of manuals |
Page 1 highlights
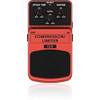
COMPRESSOR/LIMITER CL9 Classic Compressor/Limiter Effects Pedal Thank you for showing your confidence in us by purchasing the BEHRINGER COMPRESSOR/LIMITER CL9. This ultimate effects pedal is specifically designed to achieve super-smooth compression and extended sustain. Thanks to its high-performance features you can compress loud and boost low signals without degrading the original sound. A compressor limits the dynamic range of a signal. This means that signal peaks will be attenuated and the level differences between loudest and softest playing are reduced. This results in a more powerful tone. 1. Controls (1) (4) (3) (2) (7) (6) (5) (1) The ATTACK TIME control determines how fast the compressor responds to input signal peaks. (2) The LEVEL control adjusts the output level. (3) The SUSTAIN control determines the amount of compression. (4) The ON/BATT LED illuminates when the effect is activated. It also serves as a battery level indicator. (5) Use the footswitch to activate/deactivate the effect. (6) Use this 1/4" TS IN connector to plug in the instrument cable. (7) The 1/4" TS OUT connector sends the signal to your amp. Use the DC IN connection to plug in a 9 V power supply (not included). The BATTERY COMPARTMENT is located underneath the pedal cover. To install or replace the 9 V battery (not included), press the hinges with a ballpoint pen and remove the pedal cover. Be careful not to scratch the unit.
-
 1
1 -
 2
2
 |
 |
