Behringer CONTROL2USB Quick Start Guide - Page 9
XENYX CONTROL2USB Getting started - driver
 |
View all Behringer CONTROL2USB manuals
Add to My Manuals
Save this manual to your list of manuals |
Page 9 highlights
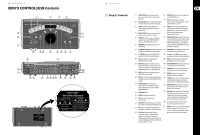
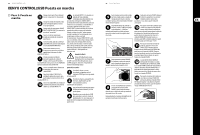
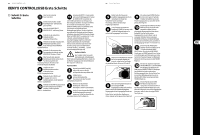
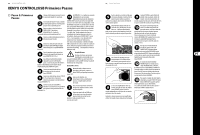
16 XENYX CONTROL2USB XENYX CONTROL2USB Getting started (EN) Step 3: Getting started Push the Power button on the rear panel to the OFF position (pushed out). Turn the volume and all level knobs (top and rear panel) to the far left position. Push all SOURCE SELECT, MONITOR SELECT, and routing switches to the out position. Connect the included power cable to the input on the back panel. Connect the audio outputs from your DAW (Digital Audio Workstation) audio interface to the MONITOR MIX INPUT. Connect active monitors or passive monitors via powered amp to the MONITOR OUT jacks A, B, and C. If you have a studio space separate from your work station, you can connect a pair of powered speakers or passive speakers via separate amplifier to the STUDIO OUT jacks. Connect a headphone distribution amplifier to the rear PHONES output jacks. Connect the 2-TRACK A and B outputs to external recording devices to record the signal coming out of your INPUTS 1-4. Connect the DAW output jacks to the inputs on your recording interface to record the signal from your INPUTS 1-4. INPUTS 1, 2 and 4 can be recorded individually or mixed together (depending on the position of the SOURCE SELECT switches) via the internal USB audio interface as a stereo signal to your computer. The signal from INPUT 3 cannot be recorded via USB, but if you press SOURCE SELECT 3, you can listen to the stereo playback signal coming back from your computer. By this logic it is possible to "rec-while-play" to your computer without the danger of producing a feedback loop. If you press SOURCE SELECT 3 along with 1, 2 or 4 while audio signals are coming in via the rear line inputs, these signals will be mixed together. The USB audio interface is class-compliant, and can be used with ASIO drivers for extra low latency (such as ASIO4ALL - link available on behringer.com). Feedback Loop A feedback loop will cause a doubling of your recorded DAW signal. If you hear this doubling effect, go to your DAW and switch off the recorded signal's monitoring output. Setting the levels: With all external sources turned down or off, push the POWER button to the ON position. Turn on external powered speakers, passive speaker amplifiers, and headphone amplifiers. Select which monitor source you wish to hear by pushing in the A, B or C button on the top panel. Play a song from your DAW to test and adjust monitor levels. Adjust the monitor out trim level knob on the back panel if necessary. 17 Quick Start Guide Adjust the gain on the input channel you selected using its trim knob on the back panel. Gauge the amount of gain necessary by observing the level meter on the top panel. Depending on the type of output from your sound card (-10 dBV for consumer or +4 dBu for professional) you might need to push the input level switch in or out. Turn the VOLUME knob up slowly. If the volume is lower than expected, adjust the trim knob for the monitor option you selected (A, B or C). If you have a headphone amplifier connected to the rear PHONES output jacks, set the input level appropriate for your sound card via the input level switch. Gradually turn up the volume on your headphone amplifier to an appropriate level. Each of the PHONES jacks on the front of the unit has its own volume control. Connect a pair of headphones to either of the phones input jacks and adjust volume to preference. To set the level for recording back to your DAW or external recording device, select the input source you wish to send on the top panel (deselect any other input sources to avoid potential feedback loop). Connect the RECORDING OUT on the back panel to your DAW audio interface or external recording device and set the output level with the +4/-10 switch. To set the level of the phonograph input, push 4 from the SOURCE SELECT section on the top panel. Make sure the rear LINE/PHONO switch is set to PHONO. Begin playback on your phonograph and adjust the trim level on input 4 (back panel). Make final adjustments with the VOLUME knob. The built-in TALKBACK microphone signal can be routed to the RECORDING OUT outputs (2-TRACK A, B and DAW) or to the PHONES/STUDIO OUT outputs (including both front panel headphones outputs). Push the button of the destination you wish to address then speak into the MIC. Make any adjustments to the signal by adjusting the TALKBACK knob. To adjust the volume of the speakers connected to the STUDIO OUT jacks, turn the STUDIO OUT knob on the top panel clockwise. If the speakers require stronger signal output, adjust the STUDIO trim knob on the back panel.
-
 1
1 -
2
-
3
-
 4
4 -
 5
5 -
 6
6 -
 7
7 -
 8
8 -
 9
9 -
 10
10 -
 11
11 -
 12
12 -
 13
13 -
 14
14 -
15
-
16
-
17
 |
 |