Behringer MINIMIC MIC800 Quick Start Guide - Page 9
Minimon Mic800 - modelling preamp
 |
View all Behringer MINIMIC MIC800 manuals
Add to My Manuals
Save this manual to your list of manuals |
Page 9 highlights
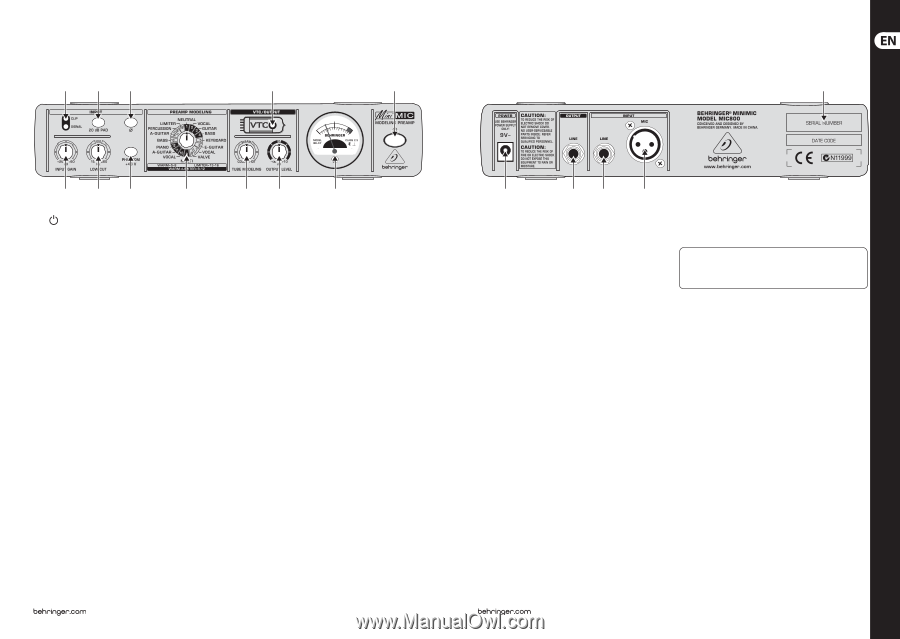
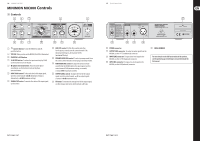
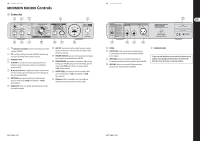
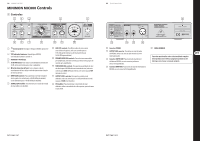
16 MINIMIC MIC800 MINIMON MIC800 Controls 17 Quick Start Guide (EN) Controls (7) (4) (5) (2) (1) (17) (6) (8) (3) (9) (10) (11) (12) (1) (power) button: To turn the MIC800 on and off, push this button. (2) VTC LED: When you turn on the MIC800, this LED is illuminated. (3) PHANTOM +48 V button. (4) 20 dB PAD button: To reduce the input sensitivity by 20 dB, use this button to turn on the pad. (5) Ø (phase inversion) button: If you encounter phase cancellation, use this button to turn on the phase inversion feature. (6) INPUT GAIN control: To boost the level of the input signal, turn this control toward +26 dB (minimum setting) or, alternatively +60 dB (maximum setting). (7) SIGNAL/CLIP meter: To monitor the status of the input signal, use this meter. (8) LOW CUT control: To filter floor rumble and other low-frequency sounds, turn this control toward 15 Hz (minimum filtering) or, alternatively 360 Hz (maximum filtering). (9) PREAMP MODELING control: To select a preamp model, turn this control, which includes several groups of preamp models. (10) TUBE MODELING control: To adjust the amount of tube warmth that the MIC800 adds to the input signal, turn this control toward COLD (minimum setting, no warmth) or toward HOT (maximum warmth). (11) OUTPUT LEVEL control: To adjust the level of the output signal, turn this control toward -∞ dB (no output signal) or toward +10 dB (maximum level). (12) VU meter: To monitor the average level of the output signal, use this vintage style meter, which includes a dB scale. (13) (14) (15) (16) (13) POWER connector. (14) OUTPUT LINE connector: To output an audio signal from the MIC800, use this ¼" TS (unbalanced) connector. (15) INPUT LINE connector: To input a line-level signal to the MIC800, use this ¼" TRS (balanced) connector. (16) INPUT MIC connector: To input a low-level signal to the MIC800, use this XLR (balanced) connector. (17) SERIAL NUMBER. For more details on the full functionality of this product, see the product page on behringer.com and download the full manual.
-
 1
1 -
2
-
3
-
 4
4 -
 5
5 -
 6
6 -
 7
7 -
 8
8 -
 9
9 -
 10
10 -
 11
11 -
 12
12 -
 13
13 -
 14
14 -
15
-
16
-
17
-
18
 |
 |