Behringer QX602MP3 Quick Start Guide - Page 12
XENYX QX602MP3 Getting started - xenyx mixer
 |
View all Behringer QX602MP3 manuals
Add to My Manuals
Save this manual to your list of manuals |
Page 12 highlights
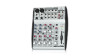
22 XENYX QX602MP3 XENYX QX602MP3 Getting started (EN) Step 3: Getting started Make all necessary connections. DO NOT turn on the power yet. Turn on your audio sources (mixer, microphones, instruments). Turn the mixer on. Adjust the overall output from the mixer to the power amp or powered speakers by turning the MAIN MIX knob clockwise. If the red CLIP LEDs on the VU METER light, turn the MAIN MIX knob counter-clockwise until the CLIP LEDs only light occasionally. Use the channel AUX/FX knobs and master AUX SEND knobs to send the channel's signal to an effects processor or monitor speaker connected to the AUX SEND jack. If used for effects, this signal should be returned to the STEREO AUX RETURN jacks. Set all controls as shown above (EQ and PAN/BAL centered, all others down/off). Set the GAIN for each channel. See the Gain Setting section for details. With the MAIN MIX knob and the PHONES/CTRL ROOM knob turned fully counter-clockwise, turn your power amp or powered speakers on. Adjust the relative levels of various microphones and instruments by turning each LEVEL knob clockwise until you achieve the desired balance. Adjust the left-right position of a channel in the stereo field if necessary by turning the channel's PAN or BAL knob. Setting the channel gain Raise Channel 1's LEVEL knob to 0. Sing, speak or play at a normal level through the microphone or instrument connected to Channel 1. 23 Quick Start Guide While singing or playing, turn Channel 1's GAIN control until the Channel 1 CLIP LED flashes occasionally, but not constantly. Press the MP3 PLAY button to begin playback or to pause. During playback, the LED above the PLAY button will blink. When playback is paused, the LED will light and remain lit. Repeat steps 1 and 2 for channel 2. MP3 Playback Insert your USB device with MP3 files into the MP3 PLAYBACK USB jack. light up. To loop an MP3 file, press the REPEAT button. While the loop function is active, the LED above the REPEAT button will Choose a routing option from the three buttons in the MP3 section below the AUX RETURN knob. • TO LINE 5/6 swaps the stereo channel 5/6 source from analog to MP3. This routing option allows you apply EQ and effects, change the stereo balance by using the BAL knob, and control the MP3 level in the overall mix by using the channel 5/6 LEVEL knob. • TO PHNS/CTRL sends MP3 audio to the PHONES and CTRL ROOM OUT outputs. You can then control the output level by using the PHONES/ CTRL ROOM knob. • TO MAIN MIX sends MP3 audio straight to the main mix. To skip forward or backward to another MP3 file, press and release the arrow buttons. To adjust the MP3 volume from the MP3 PLAYBACK section, press and hold the arrow buttons.
-
 1
1 -
2
-
3
-
4
-
5
-
6
-
 7
7 -
 8
8 -
 9
9 -
 10
10 -
 11
11 -
 12
12 -
 13
13 -
 14
14 -
 15
15 -
 16
16 -
 17
17 -
18
-
19
 |
 |
