Behringer RACKTUNER BTR2000 Manual - Page 5
Deutsch - racktuner bass
 |
View all Behringer RACKTUNER BTR2000 manuals
Add to My Manuals
Save this manual to your list of manuals |
Page 5 highlights
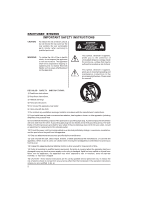
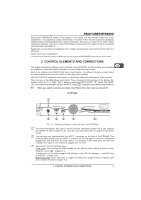
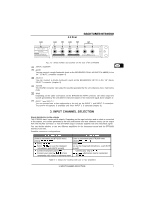
DEUTSCH RACKTUNER BTR2000 Should your BEHRINGER dealer not be located in your vicinity, you may directly contact one of our subsidiaries. Corresponding contact information is included in the original equipment packaging (Global Contact Information/European Contact Information). Should your country not be listed, please contact the distributor nearest you. A list of distributors can be found in the support area of our website (www.behringer.com/support). Registering your purchase and equipment with us helps us process your repair claims quicker and more efficiently. Thank you for your cooperation! *Customers in the European Union may have a different term, as such, please contact BEHRINGER Germany Support for further details. 2. CONTROL ELEMENTS AND CONNECTIONS This chapter describes the different control elements of your BTR2000. All of the buttons and connectors are explained in detail with useful information on how to make the most of them. Most of the buttons on the RACKTUNER have a dual function. The different functions on each button are distinguished by how long the button is held down when pressed. The RACKTUNER’s operating mode—tuner or metronome mode—also determines button function. There are one or two LEDs above each button. They correspond to the functions of the buttons. For example, either the “1” or “2/MIC” light is always on above the INPUT SELECT button. The “MUTE” LED on the other hand only lights up when the MUTE button is pressed to turn off the sound of the unit. + When you switch to metronome mode, the LEDs for the tuner mode are turned off. 2.1 Front Fig. 2.1: Operating elements on the left side of the BTR2000 The built-in microphone MIC can be used to tune the instrument (chapter 4.4.2) and calibrate the standard “A” pitch (chapter 4.2.2). To do this, you must select INPUT 2 and press the MUTE button. You can plug your instrument into the INPUT 1 connector on the front of the BTR2000. This connector takes priority over the INPUT 1 connector on the rear panel. If there are instruments plugged into both the front and back INPUT 1 connectors at the same time, the unit only evaluates the signal of the instrument plugged into the front. MODE/FINE [DISPLAY/MODE] button. Tuner mode: After pressing this button briefly you can select a tuner mode (e.g. guitar or bass) using the control (chapter 4.1). A long press of the button toggles the scaling of the LED bar between 1 cent/LED and 5 cents/LED. (Chapter 4.5). Metronome mode: Press this button to toggle the metronome display between a flashing light and a needle simulation (chapter 5.3). 2. CONTROL ELEMENTS AND CONNECTIONS 5
-
 1
1 -
 2
2 -
 3
3 -
 4
4 -
 5
5 -
 6
6 -
 7
7 -
 8
8 -
 9
9 -
 10
10 -
 11
11 -
12
-
13
-
14
-
15
-
16
-
17
-
18
-
19
 |
 |