Behringer SPRING REVERBERATION 636 Quick Start Guide - Page 9
SPRING REVERBERATION 636 Controls
 |
View all Behringer SPRING REVERBERATION 636 manuals
Add to My Manuals
Save this manual to your list of manuals |
Page 9 highlights
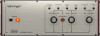
16 SPRING REVERBERATION 636 SPRING REVERBERATION 636 Controls Quick Start Guide 17 (EN) Step 2: Controls SPRING LINES We recommend that the Spring Type 636 is mounted in a place where it will not be knocked or subject to vibration to avoid unwanted noise from the spring lines. Top Panel 1. POWER SWITCH 2. POWER INDICATOR 3. OUTPUT SOCKET - use this 3.5mm TS jack socket to connect the Type 636 to amplifiers, mixing desks or audio interfaces. 4. FOOTSWITCH INPUT - use this socket to connect a suitable footswitch to bypass the reverberation effect. 5. HIGH LEVEL LINE INPUT - use this socket to connect high level audio sources such as keyboards or mixing desks to the Type 636. 6. LOW LEVEL LINE INPUT - use this socket to connect low level audio sources such as guitars to the Type 636. 7. BALANCED MICROPHONE INPUT - use this socket to connect balanced microphones to the Type 636. 8. UNBALANCED MICROPHONE INPUT - use this socket to connect unbalanced microphones to the Type 636. 9. REVERBERATE - use this control to set the reverberation output level. 10. OVERLOAD INDICATOR - this indicator lights up when a signal on either input is overloading. 11. AUX CHANNEL - use this control to set the input level for line sources connected to the auxiliary channel. 12. MIC CHANNEL - use this control to set the input level for microphone(s) connected to the microphone channel. Back Panel 13. OUTPUT SOCKET - use this 6.35mm TS jack socket to connect the Type 636 to amplifiers, mixing desks or audio interfaces. Duplicates socket 3 on top panel. 14. FOOTSWITCH INPUT - use this socket to connect a suitable footswitch to bypass the reverberation effect. Duplicates socket 4 on top panel. 15. HIGH LEVEL LINE INPUT - use this socket to connect high level audio sources such as keyboards or mixing desks to the Type 636. Duplicates socket 5 on top panel. 16. LOW LEVEL LINE INPUT - use this socket to connect low level audio sources such as guitars to the Type 636. Duplicates socket 6 on top panel. 17. BALANCED MICROPHONE INPUT - use this socket to connect balanced microphones to the Type 636. Duplicates socket 7 on top panel. 18. UNBALANCED MICROPHONE INPUT - use this socket to connect unbalanced microphones to the Type 636. Duplicates socket 8 on top panel. 19. DC POWER INPUT - use this socket to connect the supplied 12 V DC power supply.
-
 1
1 -
2
-
3
-
 4
4 -
 5
5 -
 6
6 -
 7
7 -
 8
8 -
 9
9 -
 10
10 -
 11
11 -
 12
12 -
 13
13 -
 14
14 -
15
-
16
-
17
-
18
-
19
-
20
-
21
-
22
-
23
 |
 |
