Behringer SUPER-X PRO CX2310 Manual - Page 5
Introduction, Control Elements - crossover
 |
View all Behringer SUPER-X PRO CX2310 manuals
Add to My Manuals
Save this manual to your list of manuals |
Page 5 highlights
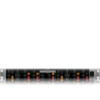
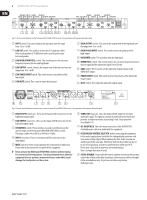
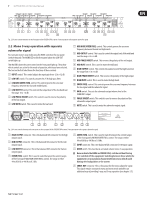
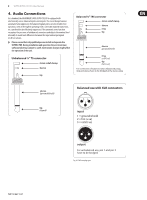
5 SUPER-X PRO CX2310 User Manual 1. Introduction If you want to operate a loudspeaker system, which consists of several loudspeakers covering different frequency bands, then you naturally have to work with suitably differentiated input signals for each loudspeaker. To do this you need a frequency crossover which can split the input signal into several frequency bands. A difference should be noted between passive crossovers which are wired between amplifier and speaker, and active systems which are placed before the amplifiers in the signal chain. Multi-way speaker systems can be found almost everywhere today-and not only in stereo systems, but in cinemas, discotheques and concert halls. As customers have become more demanding they can even be found now in such "simple" products as TV sets. Why? With the same sound pressure, low-frequency sound waves have a much greater amplitude (oscillation range) than high-frequency waves. When a single loudspeaker tries to produce bass and treble frequencies at the same time, a so-called intermodulation distortion will occur. This means that, when the speaker diaphragm is displaced by low frequencies, the treble frequencies seem to be raised in loudness, or lowered when the diaphragm reverses its direction. We cannot therefore expect a single loudspeaker to reproduce signals, spanning the whole audible frequency spectrum at the same level of quality. If, using a frequency crossover, a loudspeaker only has to reproduce a limited part of the frequency spectrum and it will do so at a greatly increased level of quality- thus producing a more regular frequency response and dispersion pattern. ◊ This manual first describes the terminology used, so that you can fully understand the SUPER-X PRO and its functions. Please read the manual carefully and keep it for future reference. 1.1 Before you begin The BEHRINGER SUPER-X PRO CX2310 was carefully packed in the factory, in order to ensure safe transport. Nevertheless, should the box show signs of damage please check the equipment itself immediately for any signs of external damage. ◊ If the unit is damaged, please do not return it to us, but notify your dealer and the shipping company immediately, otherwise claims for damage or replacement may not be granted. Shipping claims must be made by the consignee. Be sure that there is enough space around the unit for cooling and please do not place the SUPER-X PRO on high-temperature devices such as power amplifiers, etc. to avoid overheating. ◊ Before connecting the SUPER-X PRO to the mains, please carefully check that your equipment is set to the correct supply voltage! The fuse holder on the female mains connector has 3 triangular markings. Two of these triangles are opposite each other. The CX2310 is set to the operating voltage shown next to these markings. It can be set to another voltage by turning the fuse holder through 180°. CAUTION: this does not apply to export models, which were designed e.g. only for a mains voltage of 115 V! Connection to the mains is made by means of a mains cable with an IEC receptacle which complies with the appropriate safety regulations. ◊ Please note that all units must be grounded properly. For your own safety, you should never remove any ground connectors from electrical devices or power cords or render them inoperative. 1.2 Online registration Please register your new BEHRINGER equipment right after your purchase by visiting http://behringer.com and read the terms and conditions of our warranty carefully. Should your BEHRINGER product malfunction, it is our intention to have it repaired as quickly as possible. To arrange for warranty service, please contact the BEHRINGER retailer from whom the equipment was purchased. Should your BEHRINGER dealer not be located in your vicinity, you may directly contact one of our subsidiaries. Corresponding contact information is included in the original equipment packaging (Global Contact Information/European Contact Information). Should your country not be listed, please contact the distributor nearest you. A list of distributors can be found in the support area of our website (http://behringer.com). Registering your purchase and equipment with us helps us process your repair claims more quickly and efficiently. Thank you for your cooperation! 2. Control Elements Since the SUPER-X PRO offers a variety of features, we have provided the active controls with suitable light-emitting diodes. These displays help you to keep track of what is happening even in dark stage environments. Additionally, all the switches on the front panel are illuminated and can thus show which functions are presently active. There are two labels in the form of strips, located above the controls. The text of the upper label indicates mono 3-way, and the lower label indicates stereo 2-way mode. The LED's set below these labels show which controls are active in the respective mode of operation. ◊ On the rear panel, labels above/below the connectors refer to the various crossover modes available. Please make sure that the MODE switch and corresponding connectors are configured properly; otherwise, you could damage your speakers. 2.1 Stereo 2-way operation with separate subwoofer signal First, activate the 2-way mode using the MODE switch on the rear panel (switch depressed). The STEREO LED on the front panel above the LOW CUT switch in the second channel lights up. The LED's above the active control on the front panel then light up. They show you which controls are active for the mode of operation, which you have selected. The functions of these controls can be seen from the second strip label. In stereo operation the functions of both channels are identical, so that the numbers on the overview are shown for only one channel.
-
 1
1 -
 2
2 -
 3
3 -
 4
4 -
 5
5 -
 6
6 -
 7
7 -
 8
8 -
 9
9 -
 10
10 -
 11
11
 |
 |