Behringer UB1002FX Manual - Page 9
Applications - eurorack manual
 |
View all Behringer UB1002FX manuals
Add to My Manuals
Save this manual to your list of manuals |
Page 9 highlights
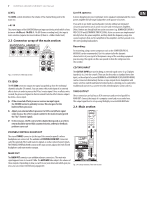
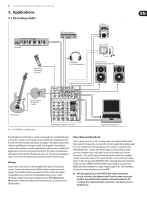
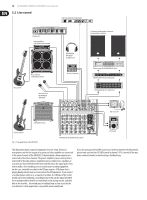
9 EURORACK UB1202FX/UB1002FX User Manual 3. Applications 3.1 Recording studio MIDI sound module Keyboard CD player MD recorder Microphone BEHRINGER B-20 PRO BEHRINGER HPS300 Headphones Active monitors BEHRINGER TRUTH B2030A Modeling amp BEHRINGER V-AMP3 Electric guitar Fig. 3.1: The UB1002FX in a recording studio BEHRINGER EURORACK UB1002FX Digital Audio Workstation Even though most of the tasks in a studio can nowadays be accomplished using a computer, a mixing console remains an unavoidable piece of equipment that lets you effectively manage audio inputs and outputs: microphone signals need to be pre-amplified prior to being recorded, and the quality of microphone sound is often worked on; recording and playback signals must be routed to the appropriate connectors or integrated into the mix; the volume of headphones and studio monitors needs to be adjusted, and so on. The extensively equipped main section of the UB mixing consoles provides concrete benefits to you. Wiring: Connect your sound sources to the microphone/line inputs of the mixing console. Connect the master machine (DAT/minidisk recorder) to the main outputs. Your monitor speakers are connected to the control room outputs; the headphones are connected to the headphone output. Now, connect the CD/tape outputs to the sound card inputs on your DAW (Digital Audio Workstation). Connect the outputs of the sound card in your computer to the CD/tape inputs. Recording and playback: Once in the mixing console, the recording signal is pre-amplified, EQ'ed and is then routed to the main bus. Use the LEVEL control to adjust the recording signal level. The overall level of the signal going to the computer is adjusted using the MAIN MIX fader. To make sure that the signal is actually being recorded, use either the phones bus or the control room bus to monitor not the main mix signal (i.e. the output signal of the mixing console, before the recording); instead, monitor the returns of the sound card that is connected to the CD/tape inputs. To this end, press the CD/TAPE TO CTRL switch and adjust the monitoring volume using the PHONES/CONTROL ROOM control. Doing so, you can record additional tracks in addition to a signal already brought in (so-called overdubs). Use the direct monitoring function of your DAW. ◊ With this application, the CD/TAPE TO MIX switch should not be pressed; otherwise, the playback signal from the sound card output would be routed back to the computer and would be added to the recording. This would not only be undesirable, it would also create a feedback loop.
-
 1
1 -
2
-
3
-
 4
4 -
 5
5 -
 6
6 -
 7
7 -
 8
8 -
 9
9 -
 10
10 -
 11
11 -
 12
12 -
 13
13 -
 14
14 -
15
-
16
 |
 |
