Behringer ULTRATONE K450FX Manual - Page 6
Mains Connection, Fuse Holder/voltage Selector, Ground Lift, Line Out, Stereo Link, Sub Out, Foot Sw - ultratone
 |
View all Behringer ULTRATONE K450FX manuals
Add to My Manuals
Save this manual to your list of manuals |
Page 6 highlights
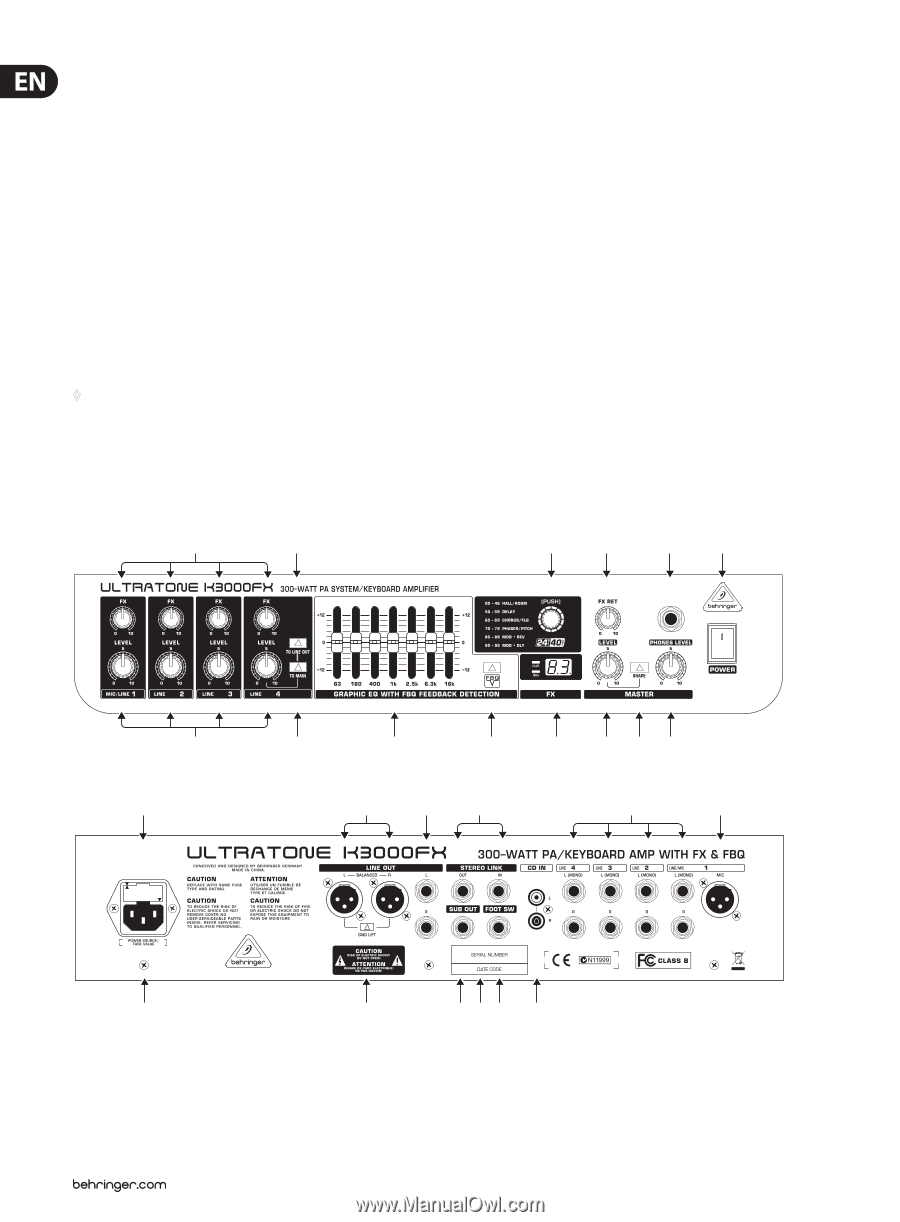
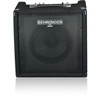
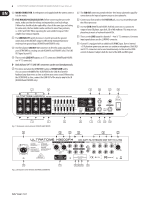
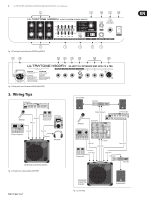
6 ULTRATONE K3000FX/K1800FX/K900FX/K450FX User Manual (15) MAINS CONNECTION. Use the power cord supplied with the unit to connect it to the mains. (16) FUSE HOLDER/VOLTAGE SELECTOR. Before connecting the unit to the mains, make sure that the voltage setting matches your local voltage. A blown fuse should only be replaced by a fuse of the same type and rating. On some units, the fuse holder can be switched to one of two positions, i.e. 230 V and 120 V. When operating the unit outside Europe at 120 V, a higher fuse rating is required. (17) The GROUND LIFT switch disconnects (switch pressed) the ground connection at the LINE OUT output to effectively eliminate hum noise resulting from ground loops (K3000FX and K1800FX only). (18) Use the balanced LINE OUT XLR connectors to feed the audio signal from your ULTRATONE to a mixing console (K3000FX and K1800FX only). The LINE OUT signal is post-EQ. (19) These are the LINE OUT outputs on 1/4" TS connectors (K900FX and K450FX: one 1/4" TS connector). ◊ Both XLR and 1/4" TS LINE OUT connectors can be used simultaneously. (20) For stereo operation the ULTRATONE features a STEREO LINK facility. You can connect the OUT of the ULTRATONE to the LINK IN of another keyboard amp that serves as slave to achieve true stereo sound. When using the ULTRATONE as slave, connect the LINK OUT of the master amp to the IN (K3000FX and K1800FX only). (21) The SUB OUT connector provides the line-level mono subwoofer signal for connection to the input of a power amp or active subwoofer. (22) Connect your footswitch to the FOOT SW jack, so as to activate/deactivate the effects processor. (23) Use the CD IN (K900FX and K450FX: AUX IN) connectors to connect the output of your CD player, tape deck, CD or MD walkman. This way you can play along to music or keyboard tutorial CDs. (24) These are the LINE inputs for channels 1 - 4 on 1/4" TS connectors. For mono input signals please use the L (MONO) connector. (25) Channel 1 is equipped with an additional XLR MIC input. Due to internal +15 V phantom power you can even use condenser microphones. Both XLR and 1/4" TS connectors can be used simultaneously. In this case the LEVEL control of channel 1 adjusts both the level of the LINE and MIC signal. (2) (4) (8) (10) (12) (14) (1) (3) Fig. 2.1: Front panel control elements (K3000FX and K1800FX) (16) (5) (6) (18) (19) (20) (7) (9) (11) (13) (24) (25) (15) (17) Fig. 2.2: Rear panel control elements (K3000FX and K1800FX) (21) (26)(22) (23)
-
 1
1 -
 2
2 -
 3
3 -
 4
4 -
 5
5 -
 6
6 -
 7
7 -
 8
8 -
 9
9 -
 10
10 -
 11
11
 |
 |