Behringer WASP DELUXE Quick Start Guide - Page 8
Step 2: Controls - manual
 |
View all Behringer WASP DELUXE manuals
Add to My Manuals
Save this manual to your list of manuals |
Page 8 highlights
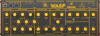
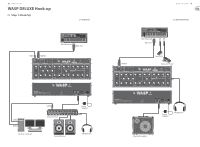
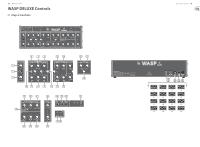
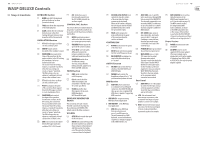
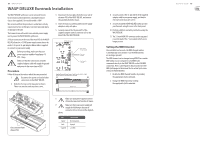
14 WASP DELUXE WASP DELUXE Controls (EN) Step 2: Controls KEYBOARD Section (1) BEND knob shifts the keyboard pitch up (clockwise) or down (counterclockwise). (2) TUNE knob allows fine adjustment of the keyboard pitch. (3) GLIDE controls the rate of change from one note to the other. Turning the knob clockwise slows down the shift to the next pitch. OSCILLATORS Section (4) FT knob for the upper oscillator sets the oscillator's pitch. (5) WIDTH % knob controls the width of the oscillator's sound. (6) WAVEFORM knob controls the shape of the waveform for the upper oscillator. In the OFF setting, the waveform is left as an unaltered sine wave. The second-from-left setting imposes a "sawtooth" waveform, while the next setting over creates a "square" waveform. The ENH setting acts as an enhancer to add punch, bit and clarity to the oscillator's tone. (7) FT knob for the lower oscillator sets the oscillator's pitch. (8) PITCH knob adjusts the pitch of the second oscillator against the pitch of the upper oscillator to create modulation effects. (9) WAVEFORM knob controls the shape of the waveform for the lower oscillator. In the OFF setting, the waveform is left as an unaltered sine wave. The second-from-left setting imposes a "sawtooth" waveform, while the next setting over creates a "square" waveform. The ENH setting acts as an enhancer to add punch, bit and clarity to the oscillator's tone. (10) MIX section controls the relative blend of the upper and lower oscillator (OSC 1/OSC 2 knobs). (11) EXT. knob allows you to blend in audio signals from the EXT. AUDIO jack with the oscillator signals. CONTROL OSC. Section This section offers an oscillator that does not produce sound itself, but which can be used to control the primary oscillators and the filter. (12) NOISE signal knob produces white noise that can be mixed in to create percussion sounds. (13) FREQUENCY knob adjusts the speed of the control oscillator. (14) PITCH MOD. varies the pitch difference between the primary oscillators to create additional modulation effects. (15) WAVEFORM switch offers six different settings: sine was, rising sawtooth, falling sawtooth, square wave, NOISE and RND. (random). FILTER Section (16) FREQ. knob sets the filter cutoff frequency. (17) Q knob controls the filter width (for bandpass and notch filter) or the filter slope (hi- and lo-pass filters). (18) FILTER knob offers four filter options: LO (lo-pass), BAND (bandpass), NOTCH and HI (hi-pass). ENVELOPE GENERATORS Section This section has two sub-sections: VCA ENV. (controls the envelope for the oscillators) and CONTROL ENV. (which controls the filter envelopes). VCA ENV. (19) ATTACK knob controls the speed of the note onset. (20) DECAY knob controls how quickly the note volume decays while the finger remains on the keyboard and then controls the fading out of the note after the finger is removed from the keyboard. Quick Start Guide 15 (21) SUSTAIN LEVEL/REPEAT knob controls the baseline volume of the note while the finger remains on the keyboard. When set full counter-clockwise, the note repeats and the ATTACK and DECAY knobs then control the speed of the repeat. (22) HOLD switch sustains the note indefinitely at the point of the envelope when the switch is activated. CONTROL ENV. (23) ATTACK knob controls the speed of the filter onset. (24) DECAY knob controls how quickly the filter cutoff frequency decays. (25) DELAY/REPEAT knob delays the onset of the filter attack by up to 1 second. OUTPUT Section (26) VOLUME knob controls the final volume at the MAIN AUDIO and MAIN OUT jacks. (27) PHONES knob controls the headphone volume at the 1/8" TRS jack immediately above the knob. MIDI Section (28) USB PORT allows connection to a computer over a USB type B connection. The WASP DELUXE will show up as a class-compliant USB MIDI device, capable of supporting MIDI in and out. • USB MIDI IN - accepts incoming MIDI data from an application. • USB MIDI OUT - sends MIDI data to an application. (29) MIDI IN receives MIDI data from an external source over a 5-pin DIN connector. This will commonly be a MIDI keyboard, an external hardware sequencer, a computer equipped with a MIDI interface, etc. (30) MIDI THRU uses a 5-pin DIN jack is used to pass through MIDI data received at the MIDI INPUT. This data will commonly be sent to another MODEL D synthesizer to run a Poly Chain or to a drum machine assigned to a different MIDI Channel. (31) EXT. AUDIO input connects any external line-level audio source to this 3.5 mm input. If nothing is connected here, then the main audio output is internally connected to this external input. (32) POWER LED lights up to indicate the unit has been powered on. (33) MAIN AUDIO uses a 3.5 mm TRS connection to output the main audio output. Typically it can be patched to the audio input of another WASP DELUXE or to the audio inputs of other modular synthesizer equipment. If you are using the WASP DELUXE in a Eurorack, then this is the main output, as the rear panel output connectors are not used. Rear Panel (34) MAIN OUT uses ¼" TRS outputs to connect to the inputs of your external equipment as follows (note that they are both Mono, and not left/right): • LOW - this instrument-level mono output can connect to the instrument-level inputs of guitar amplifiers or mixers for example. • HIGH - this line-level mono output can connect to the line-level inputs of mixers, keyboard amplifiers, or powered speakers for example. (35) MIDI CHANNEL has 4 switches that allow you to set the MIDI Channel number from 1 to 16 (see the table on page 13). The MIDI channel can also be changed using MIDI SysEx commands, as shown in the MIDI SysEx tables later in this manual. (This method is used when the WASP DELUXE is housed in a Eurorack, and these switches are no longer present.) Power Section (36) POWER switch turns the unit on and off. (37) DC INPUT connects to the supplied 12V DC power adapter. tThe power adapter can be plugged into an AC outlet capable of supplying from 100V to 240V at 50 Hz/60 Hz. Use only the power adapter supplied.
-
 1
1 -
2
-
 3
3 -
 4
4 -
 5
5 -
 6
6 -
 7
7 -
 8
8 -
 9
9 -
 10
10 -
 11
11 -
 12
12 -
 13
13 -
14
-
15
 |
 |
