Beko CCFM3571 Owners Manual - Page 6
Electrical Requirements, Transportation Instructions
 |
View all Beko CCFM3571 manuals
Add to My Manuals
Save this manual to your list of manuals |
Page 6 highlights
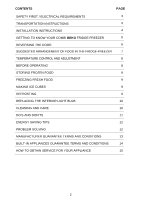
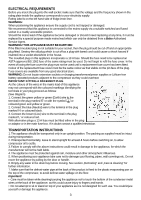
ELECTRICAL REQUIREMENTS Before you insert the plug into the wall socket make sure that the voltage and the frequency shown in the rating plate inside the appliance corresponds to your electricity supply. Rating label is on the left hand side of fridge inner liner. WARNING: When positioning the appliance ensure the supply cord is not trapped or damaged. We recommend that this appliance is connected to the mains supply via a suitable switched and fused socket in a readily accessible position. Should the mains lead of the appliance become damaged or should it need replacing at any time, it must be replaced by a special purpose made mains lead which can only be obtained from a Beko Authorised Service Agent. WARNING! THIS APPLIANCE MUST BE EARTHED If the fitted moulded plug is not suitable for your socket, then the plug should be cut off and an appropriate plug fitted. Destroy the old plug which is cut off as a plug with bared cord could cause a shock hazard if inserted into a socket elsewhere in the house. The moulded plug on this appliance incorporates a 13 A fuse. Should the fuse need to be replaced an ASTA approved BS 1362 fuse of the same rating must be used. Do not forget to refit the fuse cover. In the event of losing the fuse cover the plug must not be used until a replacement fuse cover has been fitted. Colour of the replacement fuse cover must be the same colour as that visible on the pin face of the plug. Fuse covers are available from any good electrical store. WARNING: Do not locate extension sockets or charging transformers/power supplies or Lithium-Iron battery operated products adjacent to the compressor as they could overheat. IMPORTANT! FITTING A DIFFERENT PLUG As the colours of the wires in the mains lead of this appliance may not correspond with the coloured markings identifying the terminals in your plug proceed as follows: (See diagram). 1. Connect the green-yellow or green (Earth) wire to the terminal in the plug marked 'E' or with the symbol or coloured green and yellow or green. 2. Connect the blue (Neutral) wire to the terminal in the plug marked 'N' or coloured black. 3. Connect the brown (Live) wire to the terminal in the plug marked 'L' or coloured red. With alternative plugs a 13 A fuse must be fitted either in the plug or adaptor or in the main fuse box. If in doubt contact a qualified electrician. TRANSPORTATION INSTRUCTIONS 1. The appliance should be transported only in an upright position. The packing as supplied must be intact during transportation. 2. If transported horizontally, leave to stand upright for at least 4 hours before switching on, to allow compressor oil to settle. 3. Failure to comply with the above instructions could result in damage to the appliance, for which the manufacturer will not be held liable. 4. The appliance must be protected against rain, moisture and other atmospheric influences. 5. When positioning your appliance take care not to damage your flooring, pipes, wall coverings etc. Do not move the appliance by pulling by the door or handle. 6. Empty any water in the drain tray before moving. See section „Defrosting" and „Care & cleaning" for further information. 7. Make sure that the defrost water pipe at the back of the product is fixed to the plastic evaporating pan on the top of the compressor, to avoid defrost water spillage on the floor. Important! • Care must be taken while cleaning/carrying the appliance not to touch the bottom of the condenser metal wires at the back of the appliance, as this could cause injury to fingers and hands. • Do not attempt to sit or stand on top of your appliance as it is not designed for such use. You could injure yourself or damage the appliance. 3
-
 1
1 -
 2
2 -
 3
3 -
 4
4 -
 5
5 -
 6
6 -
 7
7 -
 8
8 -
 9
9 -
 10
10 -
 11
11 -
 12
12 -
13
-
14
-
15
-
16
-
17
-
18
-
19
-
20
 |
 |