Belkin AP21300-12 AP21300-12 User Manual - Page 10
Step 3, Remote DC Operation
 |
View all Belkin AP21300-12 manuals
Add to My Manuals
Save this manual to your list of manuals |
Page 10 highlights
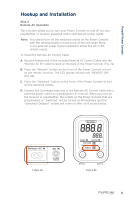
PureAV Power Console Hookup and Installation Step 3 Remote DC Operation This function allows you to turn your Power Console on and off via any component that is equipped with a 3~30V DC output (low-voltage trigger out). Note: You cannot turn off the switched outlets on the Power Console with the switched button on the front of the unit when there is any external power signal supplied to either the AC or DC remote inputs. A. Connect the Remote DC Control Cable (included) into the outlet labeled "DC IN" on the rear panel of the Power Console. (Fig. 3a) B. Press the "Remote" button on the front of the Power Console to turn on the remote function. The LCD display should read REMOTE ON. (Fig. 3b) C. Press the "Switched" button on the front of the Power Console to turn off the switched outlets. D. Connect the other end of the Remote DC Control Cable into the 3~30V output (low-voltage trigger out) on your component. When you turn on the component, the outlets on the Power Console that are programmed as "Switched" will be turned on immediately and the Switched/Delayed" outlets will come on after an 8 second delay. Figure 3a Figure 3b 9
-
 1
1 -
2
-
3
-
4
-
 5
5 -
 6
6 -
 7
7 -
 8
8 -
 9
9 -
 10
10 -
 11
11 -
 12
12 -
 13
13 -
 14
14 -
 15
15 -
16
-
17
-
18
-
19
-
20
-
21
-
22
-
23
-
24
-
25
-
26
-
27
-
28
 |
 |
