Belkin F5D5010 F5D5010 User Manual - Page 5
Installing the Notebook Network Card in PCs with CardBus Slots - cardbus network card network adapter
 |
View all Belkin F5D5010 manuals
Add to My Manuals
Save this manual to your list of manuals |
Page 5 highlights
Installing the Hardware Installing the Notebook Network Card in PCs with CardBus Slots 1. Turn off the power to the notebook. 2. Insert the Notebook Network Card in the CardBus slot of your notebook. 3. Connect the Notebook Network Card's adapter into the connector on the rear of the card. 4. Connect the other end of the CAT5 cable and RJ45 plug into the network device. Note: A standard Belkin network cable cannot be used to directly connect two computers. A specially wired cable called a crossover cable is needed to allow you to connect two computers without the use of a network hub or switch. Belkin crossover cables are yellow (Belkin's A3X126-XX-YLW-M). 2
-
 1
1 -
 2
2 -
 3
3 -
 4
4 -
 5
5 -
 6
6 -
 7
7 -
 8
8 -
 9
9 -
 10
10 -
 11
11 -
12
-
13
-
14
-
15
-
16
-
17
-
18
-
19
-
20
-
21
-
22
-
23
-
24
-
25
-
26
-
27
-
28
-
29
-
30
-
31
-
32
-
33
-
34
-
35
-
36
-
37
-
38
-
39
-
40
-
41
-
42
-
43
-
44
-
45
-
46
-
47
-
48
-
49
-
50
-
51
-
52
 |
 |

Installing the Hardware
2
Installing the Notebook Network Card in PCs with CardBus Slots
1. Turn off the power to the notebook.
2.
Insert the Notebook Network Card in the CardBus slot of
your notebook.
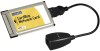
3.
Connect the Notebook
Network Card’s adapter into
the connector on the rear of
the card.
4.
Connect the other end of the
CAT5 cable and RJ45 plug
into the network device.
Note: A standard Belkin network cable cannot be used to directly
connect two computers. A specially wired cable called a crossover
cable is needed to allow you to connect two computers without
the use of a network hub or switch. Belkin crossover cables are
yellow (Belkin’s A3X126-XX-YLW-M).