Belkin F5D5131-5 User Manual - Page 2
Introduction, Installing Your 5- or 8-Port Network Switch
 |
View all Belkin F5D5131-5 manuals
Add to My Manuals
Save this manual to your list of manuals |
Page 2 highlights
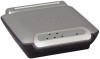
Introduction Congratulations on your purchase of this high-quality Belkin networking product. You can now enjoy the benefits of sharing one Internet account, as well as your printers and peripherals, and you can exchange data quickly between connected computers. Your new Belkin 5- or 8-Port Network Switch (the Switch) will enable communication via e-mail and the Internet for all your connected computers. The Network Switch can be used to connect PCs, additional switches, gateway routers, and other networking components. This guide explains how to install and use your Switch. Features: • Compatibility with Ethernet IEEE 802.3 and 802.3u standards • LED indicators for monitoring network traffic • 5 or 8 10/100Mbps auto-sensing RJ45 ports for easy migration from 10Base-T to 100Base-T networks • Auto uplink ports allow you to add computers to your network at any time, easily with no crossover cables • Dedicated bandwidth for each port provides for an efficient and error-free network Contents of Package: • One Belkin 5- or 8-Port 10/100Mbps Network Switch • One Power Supply • Quick Installation Guide Product Specifications Standards: IEEE 802.3 10Base-T Ethernet IEEE 802.3u 100Base-Tx fast Ethernet Protocol: CSMA/CD Ports: 5 or 8 x 10/100Base-T auto-sensing RJ45 ports, one shared uplink RJ45 port MAC Address: 1024 Unicast MAC Address Limits Unlimited Multicast MAC Addresses Max Frame: 1536 Bytes Buffer Memory: 128k Speed Per Port: 10 or 100Mbps in half duplex 20 or 200Mbps in full duplex LEDS: Power, LAN link (10/100) LAN activity Installing Your 5- or 8-Port Network Switch Connecting Your Switch to Your Computers 1. Power down all your equipment. 2. Connect a 10/100 Ethernet cable between each computer's network interface card and one of the numbered ports on the rear of the Switch. 3. Connect the power adapter cord into the power adapter socket in the rear of the Switch; now plug the adapter into a power source (wall jack or power strip). Check Your Link LEDs The power light on the Switch should be on. All ports that are connected to a computer by an Ethernet cable should also be lit-green if the connection is 100Mbps, orange if the connection is 10Mbps. All computers in your network are now ready to surf the Internet and share files.
-
 1
1 -
 2
2 -
 3
3
 |
 |
