Belkin F5U021V Setup Guide - Page 1
Belkin F5U021V - USB Hub Manual
 |
UPC - 722868554241
View all Belkin F5U021V manuals
Add to My Manuals
Save this manual to your list of manuals |
Page 1 highlights
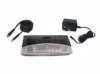
Make sure you have the following package contents: Wireless Wireless USB Adapter Stand USB Hub Adapter (optional) Power Supply Mini-USB Cable Installation (A to Mini-B) CD Quick Installation Guide Setup for XP Users 1. Insert the Belkin driver-installation CD into your CD-ROM drive. After a few moments, the setup application should appear on your computer screen. Note: If the setup application does not appear, double-click "My Computer", and then click your CD-drive icon. This will load the setup-applications main page. 2. Click "Install driver" and follow the prompts to complete the software-install process. 3. a. Connect the power supply to the Hub. b. Attach the mini-USB cable to the mini-USB port on the side of the Hub and the other end to your computer's built-in USB port (Fig. 1). This will allow your computer to recognize the Hub. Fig. 1 (A) (B) Connect the power supply Connect mini-USB cable 4. Wait approximately one minute for security to become enabled. A prompt will indicate that the security setup is complete (Fig. 2). Fig. 2 5. Once this process is complete, unplug and remove the mini-USB cable from the Hub and computer. This cable is needed only on the first installation. Store the USB cable for another computer installation if desired. 6. Connect the Wireless USB Adapter to your computer's USB port. Windows will automatically find and load drivers to complete installation (Fig. 3). Fig. 3 Laptop setup or desktop 7. Plug your USB devices into the Hub and access them wirelessly (Fig. 4). Fig. 4 Up to 30 ft. in the same room Now you can print, play music, scan, download photos and burn CDs from anywhere in the same room, up to 30 feet away, without the hassle of connecting cables. With the Belkin Wireless USB Hub, you have the freedom to roam and stay connected. Package Contents 1 Setup for XP Users 2 Setup for XP Users 3
-
 1
1 -
 2
2
 |
 |
