Belkin F6D3000 F6D3000 Quick Install Guide - Page 1
Belkin F6D3000 Manual
 |
View all Belkin F6D3000 manuals
Add to My Manuals
Save this manual to your list of manuals |
Page 1 highlights
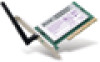
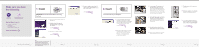
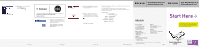
Make sure you have the following: Installation Software CD Dual-Band Wireless A+G Desktop Network Card System Requirements PC-compatible computer with: CD-ROM drive One available PCI slot Windows® 98SE, Me, 2000, or XP Start Quick Setup 1. Install IMPORTANT: Install the Software Before Inserting the Card 1.1 Insert the Installation Software CD into your CD-ROM drive. 1.2 The Belkin Setup Utility screen will automatically appear. (This may take 15-20 seconds.) Click "install" to start the installation. (click) Install 1.3 Click "Next" to install the software. (click) Next Make sure you have the following 1 Note: If the Belkin Setup Utility screen does not appear within 20 seconds, access your CD-ROM by double-clicking on the "My Computer" icon and double-click on the CD-ROM drive that the installation CD has been placed in. Double-click on the folder named "files", then double-click on the icon named "setup.exe". Install 2 1.4 Choose an installation location, then click "Next" to accept the default location or click "Browse" to select a different location before clicking "Next". (click) Next 2. Insert Insert the Card into your Computer 2.1 You will be prompted to remove the CD and insert your Card. To do so, please remove the software CD from your CD-ROM drive, click "OK" and then shut down your computer and disconnect the power. (click) OK 2.2 Remove the screws behind your computer case that secure the computer cover and remove the cover. Touch any metal part of the case to discharge static electricity and avoid damage to the product or your computer. Install 3 Insert 4 2.3 Locate an empty PCI expansion slot. It is usually white in color. Confirm that the Card will fit into the slot you have chosen. Keep in mind that the included antenna needs to be oriented with the top pointing up. If there are cables and other connectors in the way, try to pick the PCI slot that has the fewest obstructions to the correct positioning of the antenna. 2.4 Remove the metal bracket cover from the back of the computer that corresponds to the PCI slot you selected. If there is a screw, place it in a safe place, as you will be using it to attach the Card to the computer later. 2.5 Push the Card firmly into the PCI slot that you have chosen. Apply pressure as needed until the connector is fully seated. 2.6 Now secure the Card with the screw that you previously placed in a safe place. Insert 5 2.7 Turn the antenna until it is vertical and pointing up. 2.8 Replace the computer's cover. Now that the Card is installed, you can reconnect the power cord, and turn it back on. 2.9 The Found New Hardware Wizard will appear. (This may take 15-20 seconds.) Select "Install the software automatically" and click "Next" to install the hardware. (click) Next Insert 6
-
 1
1 -
 2
2
 |
 |