Belkin F8E462 F8E462 User Manual - Page 3
Setup Instructions - voice recorder for ipod
 |
UPC - 722868467756
View all Belkin F8E462 manuals
Add to My Manuals
Save this manual to your list of manuals |
Page 3 highlights
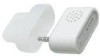
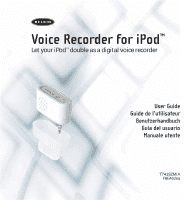
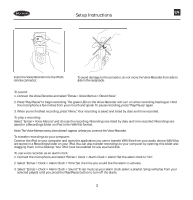
Setup Instructions EN Insert the Voice Recorder into the iPod's remote connector. To avoid damage to the connector, do not move the Voice Recorder from side to side in the receptacle. To record: 1. Connect the Voice Recorder and select "Extras > Voice Memos > Record Now". 2. Press "Play/Pause" to begin recording. The green LED on the Voice Recorder will turn on when recording has begun. Hold the microphone a few inches from your mouth and speak. To pause recording, press "Play/Pause" again. 3. When you're finished recording, press "Menu". Your recording is saved and listed by date and time recorded. To play a recording: Select "Extras > Voice Memos" and choose the recording. Recordings are listed by date and time recorded. Recordings are saved in a Recordings folder on iPod in the WAV file format. Note: The Voice Memos menu item doesn't appear unless you connect the Voice Recorder. To transfer recordings to your computer: Connect the iPod to your computer and open the application you use to transfer WAV files from your audio device. WAV files are stored in a Recordings folder on your iPod. You can also transfer recordings to your computer by opening this folder and dragging them to the desktop. Your iPod must be enabled for use as a hard disk. To use voice recorder as an alarm clock: 1. Connect the microphone and select "Extras > Clock > Alarm Clock > Alarm". Set the alarm clock to "On". 2. Select "Extras > Clock > Alarm Clock > Time". Set the time you would like the alarm to activate. 3. Select "Extras > Clock > Alarm Clock > Sound". To set music as your alarm clock, select a playlist. Songs will play from your selected playlist until you press the Play/Pause button to turn off the alarm. 3
-
 1
1 -
 2
2 -
 3
3 -
 4
4 -
 5
5 -
 6
6 -
 7
7 -
 8
8 -
 9
9
 |
 |