BenQ BL2711U 2711U User Manual - Page 30
Customizing the hot keys, Adjusting display mode, Using Smart Scaling
 |
View all BenQ BL2711U manuals
Add to My Manuals
Save this manual to your list of manuals |
Page 30 highlights
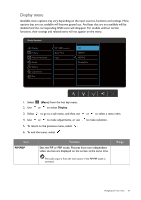
Customizing the hot keys The left 3 control keys (also called custom keys) perform as hot keys to provide direct access to pre-defined functions. You can change the default setting and designate different functions for these keys. 1. Press any of the control keys to bring up the hot key menu. Select the main menu. 2. Go to System. (Menu) to access 3. Select the custom key you want to change. 4. In the sub menu, select a function that can be accessed by this key. A pop-up message will appear, showing that the setup is complete. Adjusting display mode To display images of aspect ratio other than 16:9 and size other than the panel size of your purchased model, you can adjust the display mode on the monitor. 1. Press any of the control keys to bring up the hot key menu. Select the main menu. 2. Go to Picture Advanced and Display Mode. (Menu) to access 3. Select an appropriate display mode. The setting will take effect immediately. Using Smart Scaling You can resize your display by Smart Scaling. 1. Go to Picture Advanced and Smart Scaling. 2. Adjust the value. • If one of the custom keys is preset for Smart Scaling, you can press the custom key and adjust the value directly. • Your display may become unstable temporarily when being resized. This is a normal phenomenon and should not be considered as manufacturing defect. • For more information on Smart Scaling, go to Smart Scaling on page 39. Choosing an appropriate picture mode Your monitor provides various picture modes that are suitable for different types of images. See Picture Mode on page 37 for all the available picture modes. Go to Picture Advanced and Picture Mode for a desired picture mode. Connecting the monitor to your MacBook series product While the monitor is connected to your MacBook series product, switch to M-book mode which represents MacBook's color matching and visual representation on your monitor. 1. Connect your monitor to the MacBook series product. 2. Go to Picture Advanced and Picture Mode. 3. Select M-book. The setting will take effect immediately. 30 How to adjust your monitor
-
 1
1 -
2
-
3
-
4
-
5
-
6
-
7
-
8
-
9
-
10
-
11
-
12
-
13
-
14
-
15
-
16
-
17
-
18
-
19
-
20
-
21
-
22
-
23
-
24
-
 25
25 -
 26
26 -
 27
27 -
 28
28 -
 29
29 -
 30
30 -
 31
31 -
 32
32 -
 33
33 -
 34
34 -
 35
35 -
36
-
37
-
38
-
39
-
40
-
41
-
42
-
43
-
44
-
45
-
46
-
47
-
48
-
49
-
50
-
51
 |
 |
