BenQ DS550 User Guide - Page 15
Inserting Batteries in the Remote Control, Standby/On, Freeze, Magnify, Disk Pad, Blank, Source, - replacement lamp
 |
UPC - 750519056851
View all BenQ DS550 manuals
Add to My Manuals
Save this manual to your list of manuals |
Page 15 highlights
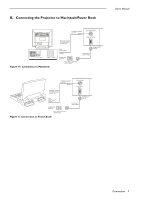
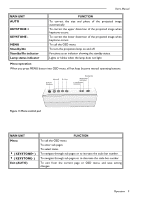
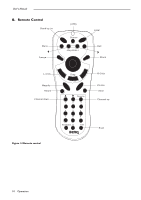
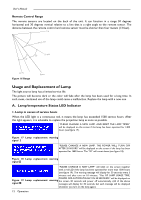
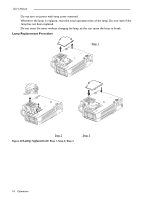
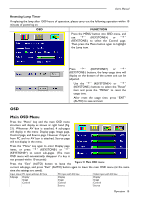
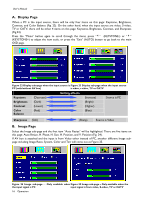
User's Manual Main Unit Standby/On Freeze Magnify Function To turn the projection lamp on and off. Pressing this button displays a still (frozen) picture. Pressing this button partially magnifies a displayed picture. (Move the picture with the Disk Pad after pressing the Magnify button.) Disk Pad Menu Blank Source Mute Volume Laser Mouse Left-Click Mouse Right- Click Exit 34Drag When the OSD menu is active, Disk Pad acts as 56selecting device. When the onscreen menus are not active, it works as mouse pad. When the magnify function is active, use disk pad to move through the picture. Call the OSD Menu. To enter sub pages. To select items. The blank screen is displayed by pressing Blank. And the blank screen will be revealed partially from top to bottom by pressing Blank again. Selects the input source. Mutes the sound. Adjusts volume. The sound gets louder or quieter by pressing the "+" or "-" button. Laser pointer on button. Use as a stick (for indication). When operating in mouse emulation mode, it registers a left mouse click. When operating in mouse emulation mode, it registers a right mouse click. To leave current OSD Pages. To move Left/Right among OSD items. The remote control allows you to operate the function keys on the projector and to emulate mouse function when the projector is connected to a computer. Inserting Batteries in the Remote Control Be sure to follow instructions in placing batteries into the remote control units. • Push and slide the lid in the direction of the arrow. • Install two 'AAA' batteries as indicated inside the battery compartment. • Replace the lid and snap into place. Caution • Avoid excessive heat and humidity. • Do not mix new and old or different types of batteries. Figure 15 Battery replacement process Operation 11
-
 1
1 -
2
-
3
-
4
-
5
-
6
-
7
-
8
-
9
-
 10
10 -
 11
11 -
 12
12 -
 13
13 -
 14
14 -
 15
15 -
 16
16 -
 17
17 -
 18
18 -
 19
19 -
 20
20 -
21
-
22
-
23
-
24
-
25
-
26
-
27
 |
 |