BenQ SW271C Paper Color Sync User Manual - Page 6
Interface introduction
 |
View all BenQ SW271C manuals
Add to My Manuals
Save this manual to your list of manuals |
Page 6 highlights
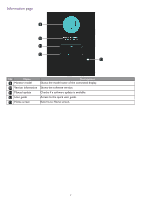
Interface introduction Home screen 1 2 3 4 5 6 8 7 No. Name 1 Monitor model Descriptions Shows the model name of the connected display. 2 Photo selection 3 Printer selection Selects photo(s) to be retouched or printed and the color space of the photo(s) will be detected and displayed automatically. If the color space cannot be detected, choose one directly for simulation. Selects a printer. 4 Paper selection Selects a paper to print the photo(s).Available options vary depending on the selected printer. 5 Application selection Selects a retouch software to launch after configuration. 6 Configuration button Configures the settings. 7 Tips Displays tips. 8 Information button Accesses version information, manual update function and the software's user guide. See Information page on page 7 for more information. 6
-
 1
1 -
 2
2 -
 3
3 -
 4
4 -
 5
5 -
 6
6 -
 7
7 -
 8
8 -
 9
9 -
 10
10 -
 11
11 -
 12
12
 |
 |
