Beretta 87 TARGET Beretta 87 Target User Manual - Page 8
Maintenance - barrel
 |
View all Beretta 87 TARGET manuals
Add to My Manuals
Save this manual to your list of manuals |
Page 8 highlights
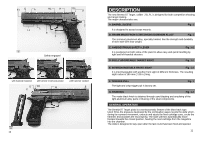
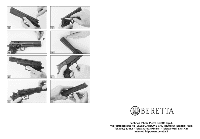
WARNING: THE PISTOL IS NOW LOADED, COCKED AND READY TO FIRE AGAIN. ENGAGE THE MANUAL SAFETY IF NOT READY TO FIRE. WARNING: The Beretta 87 Target is a target pistol and therefore it is not equipped with a safety hammer decocking device. For this reason never try to lower the hammer with a round in the chamber. To have the pistol in a safety condition, it is necessary to unload it. Proceed as indicated in the following chapter. UNLOADING THE PISTOL AND THE CARTRIDGE CHAMBER WARNING: Keep fingers away from the trigger. l Engage the manual safety if not already engaged. l Depress magazine release button (I) to remove the magazine. l Point pistol in a safe direction and release manual safety. l Grasping the slide serrations with thumb and forefinger, fully retract the slide to eject chambered round (fig. 13). WHEN SURE THAT THE CHAMBER IS EMPTY AND THE CARTRIDGE HAS BEEN EJECTED, quickly release the slide. WARNING: Point the firearm in a safe direction and holding hammer spur with thumb, completely press trigger and lower the hammer slowly forward to the uncocked position. UNLOADING THE MAGAZINE l To unload magazine, hold it upright with front end forward. With the tip of the thumb firmly press down on the cartridge rim and push towards the front of magazine box. As the cartridge moves forward, tip it slightly upwards with forefinger (fig. 14). l Repeat until magazine is empty. ADJUSTING THE REAR SIGHT AND REPLACING THE FRONT SIGHT The rear sight of Beretta 87 Target pistol is factory adjusted aligning front and rear sight (D) on the mark as shown in fig. 15. If necessary to modify the sight adjustment, proceed as follows: ADJUSTMENT FOR ELEVATION (UP). To raise the point of impact on target, turn the upper screw (D1) counter-clockwise using a suitable screwdriver (follow the arrow marked on the sight). Proceed one sector (click of the screw) at a time so that the finest adjustment is obtained (fig. 16). 14 To lower the point of impact, turn the screw clockwise. ADJUSTMENT FOR WINDAGE. To move the point of impact on target to the left, turn the side screw (D2) clockwise following the arrow marked on the right side of sight. Proceed one sector (click of the screw) at a time so that the finest FRONT SIGHT REPLACEMENT The pistol is supplied with 2 interchangeable front sights of the same height but of different thickness. The 2.5 mm front sight (E) is factory mounted and the 2 mm one is supplied separately. To replace front sight use a 2 mm Allen key and remove, unscrewing counterclockwise, the screw (E1) located over the muzzle. Extract front sight from its seat with an upward movement (fig. 18). After replacing front sight, tighten the socket head screw without applying excessive force. MAINTENANCE Every time the pistol is fired, or at least once a month, cleaning and lubricating is recommended. FIELD STRIPPING WARNING: Make sure the pistol is unloaded. If not, unload it following the "UNLOADING THE PISTOL" procedure. WARNING: It is recommended to wear protective glasses during the field stripping and assembly procedures. NOTICE: It is advisable to carry out the field stripping and the assembly operations over a table to catch components should they drop. l Remove magazine by depressing magazine release button. NOTICE: Field stripping of Beretta 87 Target can be carried out only after the counterweight slide locking screws (L1) have been loosened and the counterweight slide (L) has been removed. Proceed as follows: l Unscrew the two counterweight slide locking screws (L1) using a 3 mm Allen key (fig. 19) and remove the counterweight slide (L). l Hold pistol in the left hand, pressing with forefinger the disassembly latch release button (M1) (fig. 20); with right thumb rotate disassembly latch (M) counterclockwise until it stops (fig. 21). l Pull the barrel sleeve, slide, recoil spring and spring guide assembly forwards (fig. 22). l Pressing recoil spring guide head (caution: the recoil spring is under compression) lift the recoil spring guide and let the spring expand slowly (fig. 23). l Separate the slide from the barrel-barrel sleeve assembly. 15
-
 1
1 -
2
-
 3
3 -
 4
4 -
 5
5 -
 6
6 -
 7
7 -
 8
8 -
 9
9 -
 10
10
 |
 |