Beretta 92 FS Compact Inox Operating Instructions - Page 13
Beretta 92 FS Compact Inox Manual
 |
View all Beretta 92 FS Compact Inox manuals
Add to My Manuals
Save this manual to your list of manuals |
Page 13 highlights
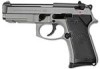
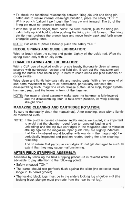
NOTE: The disassembling latch can be reached and depressed by the right hand index finger while using the left thumb to either pull or push down the latch wing. When using the left hand to operate the disassembling latch system you can choose to place your left hand from below the frame pulling down the latch wing or place your left hand above the slide pushing down the latch wing by the thumb. • In one smooth stroke pull the barrel/slide assembly forward off the frame (Fig. 14). WARNING: The recoil spring guide is held under pressure by the recoil spring. Be careful not to inadvertently cause this unit to "shoot off" the barrel/slide assembly. NOTE: The barrel/slide assembly can be pulled off the frame also by grasping the slide from above. That method has the advantage that the thumb can be swung under the slide, supporting the recoil spring/guide unit while pulling the barrel/slide assembly off the frame. • To dismantle the recoil spring guide unit, rest the barrel/slide assembly turned upside down in the palm of your hand, muzzle forward (Fig. 15). Caution: Spring and guide are under tension. • Place the tip of the index finger at the front corner of the slide and the tip of the thumb on the head of the recoil spring guide and squeeze, just enough to obtain the spring pressure. Carefully swing up the recoil spring guide until its head clears the locking block and barrel lug. Ease up thumb pressure to relax spring tension and remove spring and guide. NOTE: The recoil spring guide can also be dismantled by: Grasping the head of the guide between thumb and index finger, push forward, lift and ease up spring tension. By placing the thumb across the locking block, push forward, lift and ease up spring tension. • To dismantle the barrel/locking block unit from the slide, proceed as follows: Keeping the slide in the palm of your hand as when removing the recoil spring and guide (Fig. 16), place the tip of the index finger in front of the front barrel lug and the thumb against the plunger protruding the rear barrel lug. Push the plunger forward to raise the locking block. When the locking block lugs clear the slide's locking block shoulders, push the barrel forward just enough for the barrel to clear the extractor head, lift the barrel to clear the breech and pull it out of the slide. NOTE: If preferred, support the slide in the palm of your hand, muzzle toward yourself. Place the tip of the index finger on the plunger and the thumb against the barrel front lug (Fig 17 and 18), otherwise proceed as explained above. WARNING: Avoid pulling the trigger to initiate hammer fall when the pistol is field stripped. NO FURTHER DISASSEMBLY IS RECOMMENDED UNLESS DONE BY A COMPETENT GUNSMITH OR ARMORER. 12
-
 1
1 -
2
-
3
-
4
-
5
-
6
-
7
-
 8
8 -
 9
9 -
 10
10 -
 11
11 -
 12
12 -
 13
13 -
 14
14 -
 15
15 -
 16
16 -
 17
17 -
 18
18 -
19
-
20
-
21
-
22
-
23
-
24
 |
 |