Beretta 96A1 Beretta 92 Series User Manual - Page 8
Maintenance - kit
 |
View all Beretta 96A1 manuals
Add to My Manuals
Save this manual to your list of manuals |
Page 8 highlights
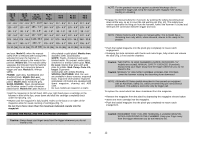
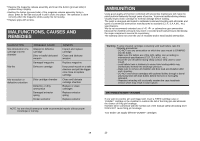
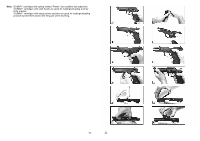
MAINTENANCE Every time the pistol is fired or at least once a month, cleaning and lubricating is recommended. FIELD STRIPPING Caution: Make sure the pistol is unloaded. If not, unload it following the "UNLOADING THE PISTOL" procedure. • Remove magazine by depressing magazine release button. • Hold pistol in the right hand; with left forefinger press disassembling latch release button and with left thumb rotate disassembling latch clockwise until it stops (Fig. 17). • Pull the slide barrel assembly forward with locking block, recoil spring and spring guide (Fig. 18). • Slightly press recoil spring and spring guide (Fig. 19). Caution: Spring and spring guide are under tension. • Lift spring guide and recoil spring, letting the latter stretch slowly (Fig. 20). • Press locking block plunger (Fig. 21). • Take out the barrel locking assembly from slide (Fig. 22). NO FURTHER DISASSEMBLY IS RECOMMENDED UNLESS DONE BY A COMPETENT GUNSMITH. Target and Competition Conversion Kit Models: NOTE: The counterweight sleeve G is locked to the barrel by the ring nut G1 and the locking screw G2 (Fig. 5, 6). Therefore, if separation of barrel from slide is required, it is first necessary to separate the counterweight sleeve from the barrel. (It is advisable to carry out this operation when pistol is assembled). Proceed as follows: • Remove magazine • Unscrew the ring nut anticlockwise using the multiple spanner supplied and separate it from the barrel. 15 • With the Allen Key of the multiple spanner loosen the locking screw (at least 2 turns) • Pull forward the counterweight sleeve. Caution: slip out of barrel also the barrel - counterweight spacer. • Follow the normal field stripping procedure. CLEANING AND LUBRICATING BARREL CLEANING AND LUBRICATING • Spray the supplied brush with a good grade of CLP (cleaner-lubricant-preservative) gun oil. Insert the brush into the barrel from the chamber and scrub the chamber and bore thoroughly. • Dry chamber and bore by pushing a flannel patch through the chamber and bore with the brush. Keep changing the patch until it emerges clean. • Clean the locking block with a cloth soaked in gun oil; if necessary use the brush supplied. • Lightly oil the inside and outside of the barrel, passing through it a clean flannel soaked in gun oil. Lightly oil the locking block. SLIDE CLEANING AND LUBRICATING • Clean slide with a cloth and/or brush soaked in gun oil, paying special attention to the breech face and extractor, slide rails and underside of breech. Wipe clean. • Lightly oil the slide. Drop a few drops of oil around the extractor, firing pin block and safety and finger activate the parts to insure oil penetrations and free movement. RECOIL SPRING AND SPRING GUIDE LUBRICATING • Lightly oil recoil spring and spring guide with gun oil. After long use it may be necessary fo first clean with gun oil and the brush supplied. FRAME CLEANING AND LUBRICATION • With oil soaked rag or brush, clean all areas covered by gunpowder residue and field dirt. • Wipe clean and lightly lubricate rails and moving parts. Be sure to oil the disassembling latch, magazine catch, slide stop, trigger system, hammer, sear, and the levers in front of the hammer. MAGAZINE CLEANING AND CARTRIDGE ROTATION • Be sure to thoroughly clean the magazine(s). After cleaning, wipe with a lightly oil moistened rag. • If the pistol is carried chamber and magazine loaded, it is important to periodically unload all magazines for cartridge inspection. Target and Competition Conversion Kit models: After having cleaned and lubricated the pistol, if necessary clean and lightly oil the inside of the counterweight sleeve. 16
-
 1
1 -
2
-
 3
3 -
 4
4 -
 5
5 -
 6
6 -
 7
7 -
 8
8 -
 9
9 -
 10
10 -
 11
11 -
 12
12
 |
 |