Beretta Sako 85 Black Bear Sako 85 User Manual - Page 17
Operation, Open Sight Adjustments, Mounting And Using The Original Sako, Optilock Scope Mounts - rifle
 |
View all Beretta Sako 85 Black Bear manuals
Add to My Manuals
Save this manual to your list of manuals |
Page 17 highlights
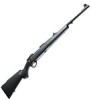
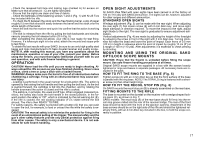
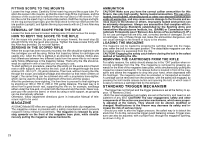
- Check the recessed bolt face and locking lugs (marked A) for excess oil. Make sure that all areas (A - C) are lightly lubricated. - Ensure that the sights are clean and free of debris. - Check the tightness of the fastening screws 1 and 2 (Fig. 1) with Nr 25 Torx key included with the rifle . - To check the fit between the stock and the free floating barrel, a slip of paper roughly 0.5 mm thick should fit easily between the barrel and the stock over the whole length of the barrel. - Insert the bolt into the receiver and cycle it to confirm that the action is working properly. - The bolt is released from the rifle by pulling the bolt backwards and simultaneously pressing the bolt release button (D in Fig. 5). After completing the check-list above, your rifle is now ready for test firing. However, if a telescopic sight is to be used, attach the mounts and scope prior to test firing. To obtain the best results with your SAKO, be sure to use only high quality steel bases and rings manufactured to fit Sako dovetail receiver and quality scope. NOTE! If, after reading this manual, you have any questions about the maintenance, operation or use of your rifle, consult your dealer. Before using the firearm, you must thoroughly familiarize yourself with its use and operation, and with safe firearm handling in general. OPERATION CAUTION! Never load the rifle until you are ready to begin shooting. Always unload the rifle as soon as you have finished shooting. Never cross a fence, climb a tree or jump a ditch with a loaded firearm. WARNING! Always make sure the barrel is free of all obstructions before chambering a cartridge. Firing with an obstructed barrel may cause serious injury. - Loading is performed in the usual manner for a bolt-action rifle. The action is opened by first raising the bolt handle and then pulling the bolt back. As the bolt is pushed forward, the cartridge is fed into the chamber, and by rotating the handle downward the action is closed and the rifle is cocked. - The safety is, in principle, the usual on/off type. When engaged (rearward position), the safety also locks the bolt handle in the closed position. In the forward position the safety is "Off", which is indicated by the red warning dot (E). If the rifle is cocked, the red cocking indicator (F) is visible behind the bolt shroud. The rifle is then READY TO FIRE. For safety reasons, the safety is provided with a button (G) that you can push to open the bolt, for example, to load or unload the rifle while the safety is engaged. CAUTION! The manual safety is to minimize the potential for firing in the event of an unintentional pulling of the trigger. The manual safety and the gun's other safety features provide only partial protection against firing from other causes. The safety is only a mechanical device. It is not substitute for safe firearm handling. OPEN SIGHT ADJUSTMENTS All SAKO rifles fitted with open sights have been zeroed in at the factory at 100 m (110 yds) with SAKO ammunition. The sights can be, however, adjusted for other ranges and different ammunition. STANDARD OPEN SIGHTS Windage adjustment (Fig. 3) can be made with the rear sight. When adjusting the rear sight (1) first loosen screw (2) with 2 mm Allen key, and move sight blade sideways in direction required. To move the impact to the right, adjust sight blade to the right. The rear sight is graduated to ensure adjustment estimation. Vertical adjustments (Fig. 4) are made by adjusting the height of the foresight by adjusting the screw in front of the sight with 2 mm Allen key. Turning clockwise will raise the bead and lower the point of impact. Each move of 0.5 mm (.02 in) in height or sideways alters the point of impact by roughly 12 cm (5") at a range of 100 m (110 yds). After adjustments it is essential to check zeroing by shooting. MOUNTING AND USING THE ORIGINAL SAKO OPTILOCK SCOPE MOUNTS CAUTION: Enure that the firearm is unloaded before fitting the scope mount. Use safe firearm handling procedures at all times. Original SAKO scope mounts are supplied in a box with the screws loosely tightened or rings and bases in separate packages. All necessary tools are included in the pack. HOW TO FIT THE RING TO THE BASE (Fig. 6) Tighten screw (A) with an 4 mm Allen key so that the front surface of the base is parallel with the ring base. NOTE! The XTRA LO ring is fastened with a shorter screw (A) than other height rings. HOW TO FIT THE RECOIL STOP PIN (Fig. 6) On SAKO mounts the recoil stop pin (B) is already assembled on the rear base. FITTING MOUNTS TO THE RIFLE The base is mounted on the dovetail on the receiver with a wedge shaped locking piece (C), as shown in Fig. 7. SAKO models: The recoil stop (B) of the rear base should fit firmly into the recoil stop groove milled into the rear of the receiver bridge. The rear of the front base should be level with the front of the ejection opening. Attachment of the base screws should be on the right side of the rifle and should be tightened relatively firmly, with an 4 mm Allen key included in the box, to hold the scope correctly in position. 17
-
 1
1 -
2
-
3
-
4
-
5
-
6
-
7
-
8
-
9
-
10
-
11
-
 12
12 -
 13
13 -
 14
14 -
 15
15 -
 16
16 -
 17
17 -
 18
18 -
 19
19 -
 20
20 -
 21
21 -
 22
22 -
23
-
24
-
25
-
26
-
27
-
28
-
29
-
30
-
31
-
32
-
33
-
34
-
35
-
36
-
37
-
38
-
39
-
40
-
41
-
42
-
43
-
44
-
45
-
46
-
47
-
48
-
49
-
50
-
51
-
52
-
53
-
54
-
55
-
56
-
57
-
58
-
59
-
60
 |
 |
