Binatone Focus 360 User Guide - Page 14
Outdoor Camera Unit Installation, IMPORTANT
 |
View all Binatone Focus 360 manuals
Add to My Manuals
Save this manual to your list of manuals |
Page 14 highlights
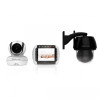
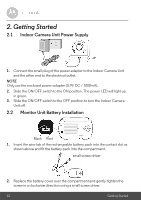
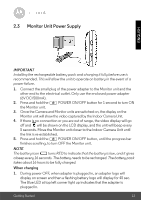
2. During power ON, when the adapter is plugged in, the battery icon on screen's top right corner will show that the battery is charging. The Blue LED at the top left corner lights up to indicate that the adapter is plugged in. 2.4 Outdoor Camera Unit Installation IMPORTANT • This product is not intended for submersion in water. For outdoor use, mount it in a sheltered place where it is not directly exposed to rain or snow. • Determine a location for the Camera Unit that will provide the best • view of the surrounding environment and activities you wish to monitor. • Select a location for the camera that has an ambient temperature between 14°F~122°F (-10°C~50°C). • Avoid installing the camera where there are thick walls or obstructions between the camera and the monitor unit. • Avoid installing in a location which requires the wireless signal to pass through cement, concrete, and metal structures. This will reduce the range of transmission. • Carefully plan where and how the Camera Unit will be positioned and where you will route the cable that connects the Camera Unit to the power adapter. • Aim the camera(s) to best optimize the viewing area: select a location for the camera that provides a clear view of the area you want to monitor, that is free from dust, and that is not in line-of-sight to a strong light source or direct sunlight. • Before starting permanent installation, verify the Camera Unit's performance by observing the image on a monitor when the Camera Unit is positioned in the same location/position where it will be permanently installed. • Avoid letting power cords rub against any sharp edges or lie across any high traffic areas where people might trip over them. 14 Getting Started
-
 1
1 -
2
-
3
-
4
-
5
-
6
-
7
-
8
-
 9
9 -
 10
10 -
 11
11 -
 12
12 -
 13
13 -
 14
14 -
 15
15 -
 16
16 -
 17
17 -
 18
18 -
 19
19 -
20
-
21
-
22
-
23
-
24
-
25
-
26
-
27
-
28
-
29
-
30
-
31
-
32
-
33
-
34
-
35
 |
 |
