Binatone MBP33S User Guide - Page 11
Using the Baby Monitor
 |
View all Binatone MBP33S manuals
Add to My Manuals
Save this manual to your list of manuals |
Page 11 highlights
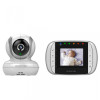
ENGLISH 3. Using the Baby Monitor 3.1 Setting up • Place the baby unit in a convenient location (e.g. on a table) and point the camera lens towards the area you want to monitor. • Adjust the baby unit's head angle by rotating the camera up, down, left and right until you are satisfied with the image in the parent unit. NOTE Do not place the baby unit within baby's reach! If there is interference with the picture or sound, try moving the units to different locations, and ensure they are not close to other electrical equipment. 3.2 Manual Pan and Tilt You can rotate the cam sphere up/down/left/right by hand to desire angle. 3.3 Night Vision Mode The baby unit has 8 high-intensity infrared LEDs for picking up clear images in the dark. When the built-in photo sensor detects a low level of ambient light, the LEDs will automatically activate and the screen on the parent unit will display in black and white. The N icon will be displayed on the screen. 3.4 Talk Mode Press and hold the T TALK button on the parent unit to talk to your baby through the baby unit's loudspeaker. The T icon will be displayed at the top of the LCD screen. 3.5 Video ON/OFF Press V VIDEO ON/OFF key to turn the LCD display on or off, but will still leave the audio monitor on. 3.6 Temperature Display (HH ºC / ºF or LL ºC / ºF) The temperature reading from the temperature sensor at the back of the Baby Unit will be displayed at the top of the LCD screen. The readings will turn RED if the temperature goes above 29ºC / 84ºF or below 14ºC / 57ºF. The reading will change to HH ºC / ºF if the temperature goes above 36ºC / 97ºF. The reading will change to LL ºC / ºF if the temperature goes below 1ºC / 34ºF. Using the Baby Monitor 11
-
 1
1 -
2
-
3
-
4
-
5
-
 6
6 -
 7
7 -
 8
8 -
 9
9 -
 10
10 -
 11
11 -
 12
12 -
 13
13 -
 14
14 -
 15
15 -
 16
16 -
17
-
18
-
19
-
20
-
21
-
22
-
23
-
24
-
25
-
26
-
27
 |
 |
