Biostar G31-M7 Bios Setup
Biostar G31-M7 Manual
 |
View all Biostar G31-M7 manuals
Add to My Manuals
Save this manual to your list of manuals |
Biostar G31-M7 manual content summary:
- Biostar G31-M7 | Bios Setup - Page 1
G31-M7/P31-A7 BIOS Manual Table of Contents BIOS Setup ...1 1 Main Menu ...3 2 Standard CMOS Features...6 3 Advanced BIOS Features ...8 4 Advanced Chipset Features...14 5 Integrated Peripherals...17 6 Power Management Setup...23 7 PnP/PCI Configurations...29 8 PC Health Status ...32 9 Performance - Biostar G31-M7 | Bios Setup - Page 2
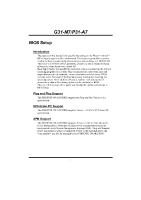
G31-M7/P31-A7 BIOS Setup Introduction The purpose of this manual is to describe the settings in the Phoenix-Award™ BIOS Setup program on this motherboard. The Setup program allows users to modify the basic system configuration and save these settings to CMOS RAM. The power of CMOS RAM is supplied by - Biostar G31-M7 | Bios Setup - Page 3
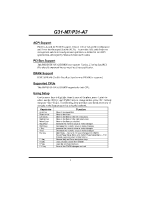
G31-M7/P31-A7 ACPI Support Phoenix-Award ACPI BIOS support Version 1.0b of Advanced Configuration and Power interface specification (ACPI). It provides ASL code for power management and device configuration capabilities as defined in the ACPI specification, developed by Microsoft, Intel and Toshiba. - Biostar G31-M7 | Bios Setup - Page 4
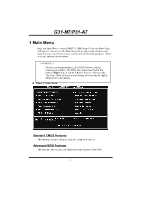
G31-M7/P31-A7 1 Main Menu Once you enter Phoenix-Award BIOS™ CMOS Setup Utility, the Main Menu will appear , the BIOS firmware is being continuously updated. The BIOS information described in this manual (Figure 1, 2, 3, 4, 5, 6, 7, 8, 9 ) is for your reference only. The actual BIOS information and - Biostar G31-M7 | Bios Setup - Page 5
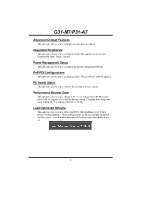
G31-M7 and PCI options. PC Health Status This submenu allows you to monitor the hardware of your system. Performance Booster Zone This submenu allows you to Optimized Defaults This selection allows you to reload the BIOS when problem occurs during system booting sequence. These configurations are - Biostar G31-M7 | Bios Setup - Page 6
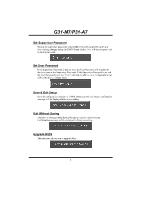
G31-M7/P31-A7 Set Supervisor Password Setting the supervisor password will prohibit everyone except the supervisor from making changes all changes made during the current session and exit setup. Confirmation message will be displayed before proceeding. Upgrade BIOS This submenu allows you to upgrade - Biostar G31-M7 | Bios Setup - Page 7
G31-M7/P31-A7 2 Standard CMOS Features The items in Standard CMOS Setup Menu are divided into several categories. Each category includes no, one or more than - Biostar G31-M7 | Bios Setup - Page 8
G31-M7/P31-A7 Item Options None 360K, 5.25 in Drive A/B 1.2M, 5.25 in 720K, 3.5 in 1.44M, up. Displays the total memory available in the system. Select the situation in which you want the BIOS to stop the POST process and notify you. Select the default video device. Select the type of floppy disk - Biostar G31-M7 | Bios Setup - Page 9
G31-M7/P31-A7 3 Advanced BIOS Features „ Figure 3: Advanced BIOS Setup Virus Warning This option allows you to choose the VIRUS Warning feature that is used to protect the IDE Hard Disk boot sector. If this function is enabled and an attempt is made to write to the boot sector, BIOS will display a - Biostar G31-M7 | Bios Setup - Page 10
G31-M7/P31-A7 Quick Power On Self Test Enabling this option will cause an abridged version of the Power On Self-Test (POST) to execute after - Biostar G31-M7 | Bios Setup - Page 11
G31-M7/P31-A7 Security Option This option will enable only individuals with Control For OS The BIOS supports version 1.1 and 1.4 of the Intel multiprocessor specification. Select version supported by the operation system running on this computer. The Choices: 1.4 (default), 1.1. OS Select For - Biostar G31-M7 | Bios Setup - Page 12
G31-M7/P31-A7 Cache Setup CPU L3 Cache Depending on the CPU/chipset in use, you may be able to increase memory access time with this option. Enabled (default) Enable cache. Disabled Disable cache. 11 - Biostar G31-M7 | Bios Setup - Page 13
G31-M7/P31-A7 Boot Seq & Floppy Setup This item allows you to setup boot sequence & Floppy. Hard Disk Boot Priority The BIOS will attempt to arrange the Hard Disk boot sequence automatically.You can change the Hard Disk booting sequence here. The Choices: Pri. Master, Pri. Slave, - Biostar G31-M7 | Bios Setup - Page 14
G31-M7/P31-A7 First/Second/Third Boot Device The BIOS will attempt to load the operating system in this order. The Choices: Floppy, LS120, Hard Disk, CDROM, ZIP100, USB-FDD, USB-ZIP, USB-CDROM, Legacy LAN, Disabled. Boot Other Device When enabled, BIOS will try to load the operating system from - Biostar G31-M7 | Bios Setup - Page 15
G31-M7/P31-A7 4 Advanced Chipset Features This submenu allows you to configure the have been changed incorrectly. „ Figure 4: Advanced Chipset Setup System BIOS Cacheable Selecting the "Enabled" option allows caching of the system BIOS ROM at F0000h-FFFFFh, which is able to improve the system - Biostar G31-M7 | Bios Setup - Page 16
G31-M7/P31-A7 PCI Express Root Port Func PCI-E Compliancy Mode The Choices: v1.0a (default), v1.0. PEG/Onchip VGA Control This item allows you to - Biostar G31-M7 | Bios Setup - Page 17
G31-M7/P31-A7 DVMT/FIXED Memory Size DVMT stands for „Dynamic Video Memory Technology". This is an enhancement of the unified memory architecture allocating the proper amount of display, texturing and buffer memory after the operating system has booted. The Choices: 128MB (default), 256MB, MAX. 16 - Biostar G31-M7 | Bios Setup - Page 18
G31-M7/P31-A7 5 Integrated Peripherals „ Figure 5: Integrated Peripherals OnChip IDE Device 17 - Biostar G31-M7 | Bios Setup - Page 19
and your system software both support Ultra DMA, select Auto to enable BIOS support. The Choices: Auto (default), Disabled. On-Chip Serial AT A This item allows you to choose: Disabled: disabled SATA Controller Combined Mode: PATA and SATA are combined max of 2 IDE drivers in each channel. Enhanced - Biostar G31-M7 | Bios Setup - Page 20
G31-M7/P31-A7 The Choices: Disabled, Auto, Combined Mode, Enhanced Mode (default), and SATA only. options: Azalia/AC97 Audio Select This item allows you to select the Azalia/AC97 Audio support. The Choices: Auto (default), Azalia, AC97 Audio and Modem, AC97 Audio only, AC97 Modem only, All - Biostar G31-M7 | Bios Setup - Page 21
G31-M7/P31-A7 Onboard LAN Boot ROM This item allows you to select the Onboard LAN Boot ROM. The Choices: Disabled Rom (default),Int 18h, Int 19h,PnP/BEV. Super IO Device Onboard FDC Controller Select enabled if your system has a - Biostar G31-M7 | Bios Setup - Page 22
G31-M7/P31-A7 Parallel Port Mode This item allows you to determine how the parallel is to enabled/ disabled EHCI controller only. This Bios itself may/may not have high speed USB support. If the Bios has high speed USB support built in,the support will be automately turn on when high speed device - Biostar G31-M7 | Bios Setup - Page 23
G31-M7/P31-A7 USB Operation Mode Auto decide USB device operation mode. [High the USB Keyboard/ Mouse/ USB Storage Legacy Support. Enabled (default) Enable USB Keyboard/ Mouse/ USB Storage Support. Disabled Disable USB Keyboard / Mouse/ USB Storage Support. USB Mass Storage Device Boot Setting [Auto - Biostar G31-M7 | Bios Setup - Page 24
G31-M7/P31-A7 6 Power Management Setup The Power Management Setup Menu allows you to configure your system to utilize energy conservation and power to select the suspend type under the ACPI operating system. The Choices: S1 (POS) (default) Power on Suspend S3 (STR) Suspend to RAM S1 & S3 POS+STR 23 - Biostar G31-M7 | Bios Setup - Page 25
G31-M7/P31-A7 Run VGABIOS if S3 Resume Choosing Enabled will make BIOS run VGA BIOS to initialize the VGA card when system wakes up from S3 state. The system time is shortened if you disable the function, but system will need AGP driver to initialize the card. So, if the AGP driver 15 min Max. Power - Biostar G31-M7 | Bios Setup - Page 26
G31-M7/P31-A7 Video Off Method This option determines the manner when the monitor goes blank. V/H SYNC+Blank This blanks to the video buffer. DPMS Support (default) Initial display power management signaling. Video Off In Suspend This item determines the monitor status when the system is in Suspend - Biostar G31-M7 | Bios Setup - Page 27
G31-M7/P31-A7 Soft-Off by PBTN This item determines the behavior of system power button. Instant off turn off the power immediately, and Delay 4 Sec. - Biostar G31-M7 | Bios Setup - Page 28
G31-M7/P31-A7 Primary/Secondary IDE 0/1 You can enable or disable Primary or Secondary enable or disable PCI PIRQ [A-D]# under this item. The Choices: Disabled (default), Enabled. HPET Support This item allows you to control the High Precision Event Timer. The Choices: Disabled, Enabled(default). - Biostar G31-M7 | Bios Setup - Page 29
G31-M7/P31-A7 PWRON After PWR-Fail This setting specifies how your system should behave after a power fail or interrupts occurs. By choosing off will leave - Biostar G31-M7 | Bios Setup - Page 30
G31-M7/P31-A7 7 PnP/PCI Configurations This section describes configuring the PCI bus system. PCI, or Personal Computer Interconnect, is a system which allows I/O devices to operate - Biostar G31-M7 | Bios Setup - Page 31
G31-M7/P31-A7 Reset Configuration Data The system BIOS supports the PnP feature which requires the system to , the system is forced to update ESCDs and then is automatically set to the "Disabled" mode. The above settings will be shown on the screen only if "Manual" is chosen for the resources - Biostar G31-M7 | Bios Setup - Page 32
G31-M7/P31-A7 IRQ Resources This submenu will allow you to assign each allow you to configure the system interrupts. This is only configurable when "Resources Controlled By" is set to "Manual". IRQ-3 assigned to PCI Device IRQ-4 assigned to PCI Device IRQ-5 assigned to PCI Device IRQ-7 assigned - Biostar G31-M7 | Bios Setup - Page 33
G31-M7/P31-A7 8 PC Health Status „ Figure 8: PC Health Status Smart Fan Option 32 - Biostar G31-M7 | Bios Setup - Page 34
G31-M7/P31-A7 CPU Smart Fan This item allows you to control the CPU Fan. The Choices: Disabled (default), Auto, 4-pin, 3-pin.. Choose this item and then the BIOS set value. The Choices: Min=0,.Max=127, Key in a DEC 167℉. Show H/W Monitor in POST If you computer contains a monitoring system, it will - Biostar G31-M7 | Bios Setup - Page 35
G31-M7/P31-A7 Current CPU Temperature This field displays the current temperature of CPU. Current CPU FAN Speed This field displays the current speed of CPU fan. Current SYS FAN Speed This field displays the current speed SYSTEM fan. 34 - Biostar G31-M7 | Bios Setup - Page 36
G31-M7/P31-A7 9 Performance Booster Zone „ Figure 9: Performance Booster Zone FSB Voltage This item allows you to select FSB Voltage Control. The Choices: Default (default), +0.1V, +0. - Biostar G31-M7 | Bios Setup - Page 37
G31-M7/P31-A7 CPU Feature Delay Prior to Thermal Set this item to 1 (default), Thermal Monitor 2. TM2 Bus Ratio This option represents the frequency (bus ratio) of the throttled performance state that will be initiated when the on-die sensor detects temperature increase. Min= 0 Max= 255, Key in - Biostar G31-M7 | Bios Setup - Page 38
G31-M7/P31-A7 PPM Mode This item allows you to choose PPM mode.Native mode is for fully support ACPI OS, like WIMXP,VISTM etc.,SMM mode is for legacy OS , thus enhance the performance when running virtual machines or multi interface systems Max= 50, Key in a DEC number. The Choices: 6X (default). 37 - Biostar G31-M7 | Bios Setup - Page 39
G31-M7/P31-A7 PCIE Clock Select The Choices: Fixed 100, Manual, Auto (default). PCIE Clock The Choices: 100 (default), Min=100; Max=200; key in DEC number. Auto Detect PCI Clk The Choices: Enabled (default), Disabled. CPU Clock This item allows you to select CPU Clock, and
-
 1
1 -
 2
2 -
 3
3 -
 4
4 -
 5
5 -
 6
6 -
 7
7 -
8
-
9
-
10
-
11
-
12
-
13
-
14
-
15
-
16
-
17
-
18
-
19
-
20
-
21
-
22
-
23
-
24
-
25
-
26
-
27
-
28
-
29
-
30
-
31
-
32
-
33
-
34
-
35
-
36
-
37
-
38
-
39
 |
 |

G31-M7/P31-A7 BIOS Manual
Table of Contents
BIOS Setup
................................................................................................
1
1 Main Menu
.............................................................................................
3
2 Standard CMOS Features
.....................................................................
6
3 Advanced BIOS Features
......................................................................
8
4 Advanced Chipset Features
.................................................................
14
5 Integrated Peripherals
.........................................................................
17
6 Power Management Setup
...................................................................
23
7 PnP/PCI Configurations
......................................................................
29
8 PC Health Status
..................................................................................
32
9 Performance Booster Zone
..................................................................
35