Biostar H77MU3 Setup Manual - Page 9
Step 3, Step 4, Step 5
 |
View all Biostar H77MU3 manuals
Add to My Manuals
Save this manual to your list of manuals |
Page 9 highlights
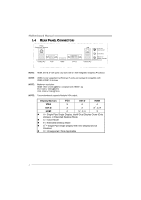
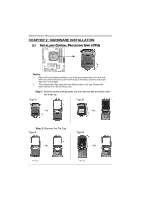
H77MU3 Step 3: Hold processor with your thumb and index fingers, oriented as shown. Align the notches with the socket. Lower the processor straight down without tilting or sliding the processor in the socket. Step 4: Hold the CPU down firmly, and then lower the lever to locked position to complete the installation. Step 5: Put the CPU Fan and heatsink assembly on the CPU and buckle it on the retention frame. Connect the CPU FAN power cable into the CPU_FAN1 to complete the installation. 7
-
 1
1 -
2
-
3
-
 4
4 -
 5
5 -
 6
6 -
 7
7 -
 8
8 -
 9
9 -
 10
10 -
 11
11 -
 12
12 -
 13
13 -
 14
14 -
15
-
16
-
17
-
18
-
19
-
20
-
21
-
22
-
23
-
24
-
25
-
26
-
27
-
28
-
29
-
30
-
31
-
32
-
33
-
34
-
35
-
36
-
37
-
38
-
39
-
40
-
41
-
42
-
43
-
44
-
45
-
46
-
47
-
48
-
49
-
50
-
51
 |
 |

H77MU3
7
Step 3:
Hold processor with your thumb and index fingers, oriented as
shown. Align the notches with the socket. Lower the processor
straight down without tilting or sliding the processor in the socket.
Step 4:
Hold the CPU down firmly, and then lower the lever to locked
position to complete the installation.
Step 5:
Put the CPU Fan and heatsink assembly on the CPU and buckle it
on the retention frame. Connect the CPU FAN power cable into
the CPU_FAN1 to complete the installation.