Biostar P4TDH Bios Setup - Page 29
Frequency Control
 |
View all Biostar P4TDH manuals
Add to My Manuals
Save this manual to your list of manuals |
Page 29 highlights
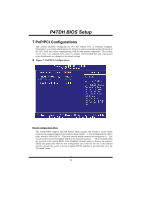
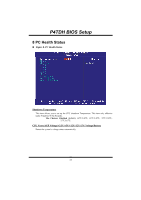
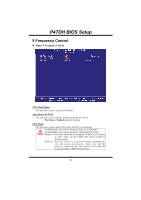
P4TDH BIOS Setup 9 Frequency Control „ Figure 9. Frequency Control CPU Clock Ratio This item allows you to select the CPU Ratio. Auto Detect PCI Clk This item allows you to enable / disable auto Detect PCI Clock. The Choices: Enabled (default), Disabled. CPU Clock This item allows you to select CPU Clock, and CPU over clocking. If unfortunately, the system's frequency that you are selected is not functioning, there are two methods of booting-up the system. Method 1: Clear the COMS data by setting the JCOMS1 ((2-3) closed)) as "ON" status. All the CMOS data will be loaded as defaults setting. Method 2: Press the key and Power button simultaneously, after that keep-on pressing the key until the power-on screen showed. This action will boot-up the system according to FSB of the processor. 28
-
 1
1 -
2
-
3
-
4
-
5
-
6
-
7
-
8
-
9
-
10
-
11
-
12
-
13
-
14
-
15
-
16
-
17
-
18
-
19
-
20
-
21
-
22
-
23
-
 24
24 -
 25
25 -
 26
26 -
 27
27 -
 28
28 -
 29
29 -
 30
30 -
 31
31
 |
 |
