Biostar TP35D2-A7 Setup Manual - Page 32
Hardware Monitor Panel
 |
View all Biostar TP35D2-A7 manuals
Add to My Manuals
Save this manual to your list of manuals |
Page 32 highlights
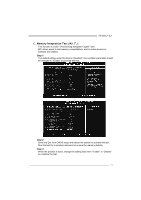
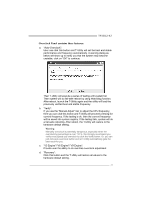
Motherboard Manual e. "Save / Open Setting": Click Save button to save current setting to a file, and click Open button to load a previously saved setting. f. "Panel Color": Click this button to change the color of the panel. Overvoltage Panel contains these features: a. "CPU Voltage": This function allows user to adjust CPU voltage. Click on "+" to increase or "-" to decrease the CPU voltage. b. "Memory Voltage": This function allows user to adjust Memory voltage. Click on "+" to increase or "-" to decrease the Memory voltage. c. "Chipset Voltage": This function allows user to adjust Chipset voltage. Click on "+" to increase or "-" to decrease the Chipset voltage. 4. Hardware Monitor Panel Click the Hardware Monitor button in Main Panel, the button will be highlighted and the Hardware Monitor panel will show up as the following figure. In this panel, you can get the real-time status information of your system. The information will be refreshed every 1 second. 30
-
 1
1 -
2
-
3
-
4
-
5
-
6
-
7
-
8
-
9
-
10
-
11
-
12
-
13
-
14
-
15
-
16
-
17
-
18
-
19
-
20
-
21
-
22
-
23
-
24
-
25
-
26
-
 27
27 -
 28
28 -
 29
29 -
 30
30 -
 31
31 -
 32
32 -
 33
33 -
 34
34 -
 35
35 -
 36
36 -
 37
37 -
38
-
39
-
40
-
41
-
42
-
43
-
44
-
45
-
46
-
47
-
48
-
49
-
50
-
51
-
52
-
53
-
54
-
55
-
56
-
57
-
58
-
59
-
60
-
61
-
62
-
63
-
64
-
65
-
66
-
67
-
68
-
69
-
70
-
71
-
72
-
73
-
74
-
75
-
76
-
77
-
78
-
79
-
80
-
81
-
82
-
83
-
84
-
85
-
86
-
87
-
88
-
89
-
90
-
91
-
92
-
93
-
94
-
95
 |
 |