Bissell Lift-Off® Multi Cyclonic Pet Vacuum User Guide - English - Page 5
Warning
 |
View all Bissell Lift-Off® Multi Cyclonic Pet Vacuum manuals
Add to My Manuals
Save this manual to your list of manuals |
Page 5 highlights
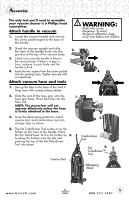
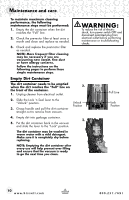
Assembly The only tool you'll need to assemble your vacuum cleaner is a Phillips head screwdriver. Attach handle to vacuum 1. Locate the vacuum handle and remove the screw packet taped to the base of the handle. Warning: Plastic film can be dangerous. To avoid danger of suffocation, keep away from babies and children. 2. Stand the vacuum upright and slide the base of the handle firmly into the 2. grooves at the top of the vacuum body. 3. Check to be sure the handle is fitted to the vacuum body. If there is a gap in front, continue to push firmly until the handle is flush. 4. Insert the two screws from the screw packet 4. into the existing holes. Tighten securely with a screwdriver. Attach vacuum hose and tools 1. Line up the tabs on the base of the Twist n' Snap hose with corresponding notches. 2. Slide the end of the hose grip onto the hose grip base. Place the hose into the 1. hose clip. NOTE: The powerfoot will not operate effectively unless the hose is firmly attached to the base. 3. Snap the telescoping extension wand, 2. crevice tool, and combination tool into storage clips as shown. 4. The Pet TurboEraser Tool snaps on to the holder on the front of the handle. Place the Pet TurboEraser Tool in the holder by 3. hooking the bottom onto the tab and pushing the top of the Pet TurboEraser Tool into place. Combination Tool Pet 4. TurboEraser™ Tool Crevice Tool Telescoping Wand www.bissell.com 5 800.237.7691
-
 1
1 -
 2
2 -
 3
3 -
 4
4 -
 5
5 -
 6
6 -
 7
7 -
 8
8 -
 9
9 -
 10
10 -
 11
11 -
12
-
13
-
14
-
15
-
16
-
17
-
18
-
19
-
20
 |
 |
