Bissell Perfect Sweep Turbo User Guide - English - Page 5
Quick and Easy Assembly, Charging the Battery - charger
 |
View all Bissell Perfect Sweep Turbo manuals
Add to My Manuals
Save this manual to your list of manuals |
Page 5 highlights
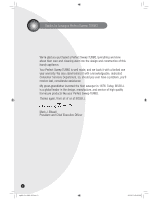
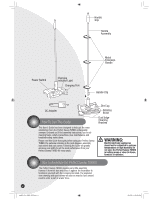
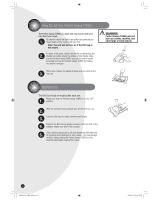
Quick and Easy Assembly Assemble the Handle by screwing together two pieces 1. of the Metal Extension Handle. Place the colored Handle Grip on top of the metal extension assembly and twist clockwise until secure. Screw the Handle Clip into the bottom of the Metal Extension Handle assembly. Place bottom of Handle Clip into the opening at the top 2. of the Perfect Sweep TURBO. Push firmly until the button at the bottom "clicks" into place in the opening. The Perfect Sweep TURBO must be fully charged before 3. using. To charge the unit, plug the DC Adapter into a standard electrical outlet (120v-60hz); plug the opposite end into the Charging Port on the back side of your Perfect Charging Cord with DC Adapter Plug Plug into Charging Port on the Motor side of the Sweep TURBO. The Charging Indicator Light will illuminate Perfect Sweep Turbo. when properly connected and will not turn off when fully charged. The Perfect Sweep TURBO is now charging. Note: The Power Switch must be in the OFF position when charging. Charging the Battery When completely charged, the Perfect Sweep TURBO 1. provides up to 60 minutes of full cleaning power. When charging for the first time, allow to charge uninterrupted 2. for at least 16 hours. Thereafter, charge at least 12 hours to renew the Perfect Sweep TURBO battery. Note: The Power Switch must be in the OFF position when charging. Decreased operating time may indicate the battery has 3. built up a charging resistance. To recharge, first completely exhaust the battery, recharge it, then exhaust it again before recharging a second time. This procedure may be required more than once. When charging is complete, be sure to unplug the 4. Perfect Sweep TURBO from the charger. If your battery still fails to recharge or does not hold a charge of normal duration, call: BISSELL Consumer Services 1-800-237-7691 Monday - Friday 8 a.m. - 10 p.m. ET Saturday 9 a.m. - 8 p.m. ET Or visit our website @ www.bissell.com ug603-1314_2880_305.indd 5 5 8/19/05 2:30:41 PM
-
 1
1 -
 2
2 -
 3
3 -
 4
4 -
 5
5 -
 6
6 -
 7
7 -
 8
8
 |
 |