Black & Decker CM1936 Type 1 Manual - RB-3612 - Page 1
Black & Decker CM1936 Manual
 |
View all Black & Decker CM1936 manuals
Add to My Manuals
Save this manual to your list of manuals |
Page 1 highlights
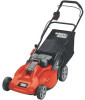
RB-3675 / RB-3612 36 volt lead acid BATTERY The battery is a 36-volt sealed lead acid system. There is no liquid contained within the battery and the mower/battery can therefore be stored in any position without fear of leakage. It is recommended that the battery be recharged after use to prolong the battery life. Frequent charging will not harm your battery, and will ensure that the battery is fully charged and ready for its next use. Storing battery not fully charged will shorten battery life. • For optimal performance the battery should be kept on constant charge when not in use. • The battery should be charged in its proper orientation. • The battery prefers to be charged in a cool, dry place. • The battery does not need to be fully discharged before recharging. • 2 to 3 initial charging cycles may be required after purchase to achieve maximum run time capacity. • A fully charged battery can be safely stored down to -40°F (-40°C). • The battery is maintenance free. • The battery is intended for use in the CM1936, CM1936Z and SPCM1936 mowers only, and the CTL36 garden tiller, and should not be used for any other purpose. BATTERY RUNTIME INDICATOR - FIGURE A (OPTIONAL FEATURE ONLY) Your battery pack is equipped with an integral Battery Runtime A Indicator. When you push the "i" button A-1, the indicator will give the battery runtime level. 1 At full charge, if you push the "i" button, all three LED's will light up indicating maximum runtime. If you want to check the runtime during your cutting: 1. Release bail handle to turn mower off, wait until the blade stops and remove safety key. 2. Push the "i" button to get an indication of runtime. All three LED's lit indicate maximum runtime available. Two LED's lit indicate approximately one-third to two-thirds of runtime available. One LED lit indicates less than one-third runtime available. You may need to charge your battery soon. Refer to Charging Procedure. Inserting / removing BATTERY - Figure A1 NOTE: Removal of the battery pack from the Tiller is identical to the description below for the Mower. A1 The battery can be removed from the mower for storage/charging or left in the mower for charging. Prior to removing battery, place mower on level ground. Release bail handle to turn mower off, wait for blade to stop, and remove safety key. Prior to the installation of the battery pack, ensure that the mower is clear of debris and the charger plug is disconnected from the battery pack. Insert the battery into the mower battery cavity and lift the lever A1-1 to lock it in place. To remove the battery, lift the lever A1-1, and then rotate back away from battery pack to unlatch clasp A1-2. Lift battery pack out. charger safety rules NOTE: Applies to Tiller as well as Mower. 1. Plug charger directly into an electrical outlet. DO NOT ABUSE THE CORD. Never carry charger by cord. Do not disconnect the charger from the outlet, mower or battery by pulling it by the cord. 2. WARNING: To reduce the risk of fire, electrical shock, or personal injury do not attempt to use this charger with any other product. Likewise, do not attempt to charge the battery with any other charger. 3. Do not service mower with charger, safety key or battery pack installed. 4. Do not operate a damaged charger. Replace damaged cords or charger immediately at an authorized Black & Decker service center. 5. Always charge the mower in a dry area protected from the weather. Do not expose the mower, battery or charger to rain. Do not charge in wet locations. Do not charge battery when temperature is above 104°F (40°C) or below 41°F (5°C). Remove battery and charge indoors if above or below these temperatures. Charge the battery in a well ventilated location. 6. Keep the mower, battery and charger away from water, heat sources, (such as radiators, heaters, stoves, etc.) flames, or chemicals. Be careful not to damage the charger cord, by keeping cord away from sharp edges. 7. Prior to reinstalling the battery into the mower, disconnect charger plug from battery, or damage may occur. WARNING: FIRE HAZARD ALWAYS DISCONNECT THE CHARGER FROM THE POWER SUPPLY (WALL OUTLET) BEFORE REMOVING THE CHARGER CONNECTOR. UNDER CERTAIN CONDITIONS, WITH THE CHARGER PLUGGED IN TO THE POWER SUPPLY, THE EXPOSED CONNECTOR CAN BE SHORTED BY FOREIGN MATERIAL AND MAY CAUSE A FIRE. FOREIGN MATERIALS OF A CONDUCTIVE NATURE, SUCH AS, BUT NOT LIMITED TO, STEEL WOOL, ALUMINUM FOIL, OR ANY BUILD-UP OF METALLIC PARTICLES, SHOULD BE KEPT FROM THE CONNECTOR. ALWAYS UNPLUG CHARGER BEFORE ATTEMPTING TO CLEAN.
-
 1
1 -
 2
2 -
 3
3 -
 4
4 -
 5
5
 |
 |
