Bosch 3931A Operating Instructions - Page 6
Assembly & Preparation - vacuum cleaner
 |
UPC - 000346407143
View all Bosch 3931A manuals
Add to My Manuals
Save this manual to your list of manuals |
Page 6 highlights
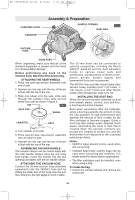
BM 1609929K45 08-06 8/14/06 11:42 AM Page 6 CANISTER LATCH CANISTER Assembly & Preparation HANDLE OPENING DUST BAG FIG. 2 VACUUM HOSE HOSE PORT When unpacking, make sure that all of the standard equipment is present and that there is no transportation damage. Before preforming any work on the machine itself, disconnect the power plug. ATTACHING THE REAR WHEELS 1. Place one axle cap-and-pin assembly onto end of axle. 2. Hammer pin into cap until the top of the pin is flush with the top of the cap. 3. Slide one wheel onto the axle, slide axle through the canister, then slide second wheel onto axle as shown in figure 3. PIN FIG. 3 AXLE CAP WHEEL CANISTER AXLE 4. Turn canister on its side. 5. Place second axle cap-and-pin assembly onto end open of axle. 6. Hammer pin into cap until the top of the pin is flush with the top of the cap. ASSEMBLING THE MAIN HANDLE The vacuum cleaner can be moved easily with the main handle. Always move the unit using both hands. Insert the handle into the two openings and fasten with the two handle clamps. ATTACHING THE VACUUM HOSE Connect the 35-mm vacuum hose (standard equipment) onto the 3931A's hose port by sliding the wider end of the hose onto the port then turning it to the right slightly to lock it in place. The 35-mm hose can be connected to optional accessories, including the Bosch VAC011 wand kit and the dust extraction hoods on various power tools and accessories, including those on Bosch router, planer, grinder, sander, jigsaw, and hammer/drill tools and accessories . The 3931A's hose port also accept many other vacuum hoses, including most 1-1/4" hoses, 11/2" hoses, 2-1/2" hoses and other Bosch hoses. (See Accessories, page 12 & 13) INSTALLING THE DUST BAG When dry-vacuuming such materials as dust from drywall, plaster, cement, soot, and flour, a dust bag should be inserted. Even when vacuuming other dry materials, using a dust bag extends the amount of time the unit operates at high performance and extends the amount of time it takes for the filter cartridge to become clogged. Using a dust bag also makes waste disposal much easier, eliminating the cloud of dust that is created when the canister contents are poured out, helping to protect you and the environment from exposure to the unwanted particles an debris. Notes: • VAC013 bags should not be used when wet vacuuming. • VAC022 heavy-duty wet/dry bags can be used when vacuuming wet materials. It is ideally suited for slurry-suction applications. • The filter cartridges must be installed, even when using a bag. To install the bag: 1. Unlock the canister latches and remove the control unit. -6-
-
 1
1 -
 2
2 -
 3
3 -
 4
4 -
 5
5 -
 6
6 -
 7
7 -
 8
8 -
 9
9 -
 10
10 -
 11
11 -
 12
12 -
13
-
14
-
15
-
16
-
17
-
18
-
19
-
20
-
21
-
22
-
23
-
24
-
25
-
26
-
27
-
28
-
29
-
30
-
31
-
32
-
33
-
34
-
35
-
36
-
37
-
38
-
39
-
40
 |
 |
