Bosch B18IF70NSP Installation Instructions - Page 6
Installation, options - dimensions
 |
View all Bosch B18IF70NSP manuals
Add to My Manuals
Save this manual to your list of manuals |
Page 6 highlights
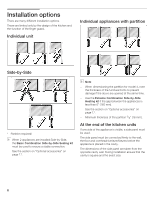
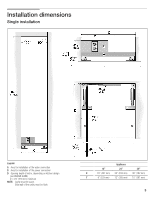
Installation options There are many different installation options. These are limited only by the design of the kitchen and the function of the finger guard. Individual unit Individual appliances with partition 1. 2. SideĆbyĆSide * * * Partition required! i When 2 appliances are installed SideĆbyĆSide, the Basic Combination SideĆbyĆSide Sealing kit must be used to ensure a stable connection. See the section on Optional accessories" on page 17. 3. 4. i Note - When dimensioning the partition for model 4, note the thickness of the furniture fronts to prevent damage if the doors are opened at the same time. - Use the Extreme Combination SideĆbyĆSide Heating kit if the gap between the appliances is less than 6" (160 mm). See the section on Optional accessories" on page 17. - Minimum thickness of the partition 5/8" (16 mm). At the end of the kitchen units If one side of the appliance is visible, a side panel must be used. The side panel must be connected firmly to the wall, the floor and overhead furniture/fixtures before the appliance is placed in the cavity. The dimensions of the side panel are taken from the opposite cavity wall. During installation ensure that the cavity is square and the exact size. 6
-
 1
1 -
 2
2 -
 3
3 -
 4
4 -
 5
5 -
 6
6 -
 7
7 -
 8
8 -
 9
9 -
 10
10 -
 11
11 -
 12
12 -
13
-
14
-
15
-
16
-
17
-
18
-
19
-
20
-
21
-
22
-
23
-
24
-
25
-
26
-
27
-
28
-
29
-
30
-
31
-
32
-
33
-
34
-
35
-
36
-
37
-
38
-
39
-
40
-
41
-
42
-
43
-
44
-
45
-
46
-
47
-
48
-
49
-
50
-
51
-
52
-
53
-
54
-
55
-
56
-
57
-
58
-
59
-
60
-
61
-
62
-
63
-
64
-
65
-
66
-
67
-
68
-
69
-
70
-
71
-
72
-
73
-
74
-
75
-
76
-
77
-
78
-
79
-
80
-
81
-
82
-
83
-
84
-
85
-
86
-
87
-
88
-
89
-
90
-
91
-
92
-
93
-
94
-
95
-
96
-
97
-
98
-
99
-
100
-
101
-
102
-
103
-
104
-
105
-
106
-
107
-
108
-
109
-
110
-
111
-
112
-
113
-
114
-
115
-
116
-
117
-
118
-
119
-
120
-
121
-
122
-
123
-
124
 |
 |
