Bosch HBL8451UC Supplement - Page 5
Ovens with Side Hinge Doors Only - lowes
 |
View all Bosch HBL8451UC manuals
Add to My Manuals
Save this manual to your list of manuals |
Page 5 highlights
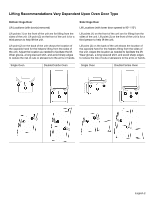
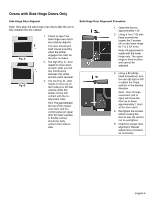
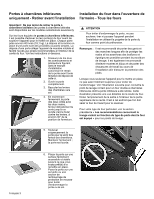
Ovens with Side Hinge Doors Only Side Hinge Door Aligment Note: Only align the side hinge oven doors after the unit is fully installed into the cabinet. Fig. A Fig. B 1. Check to see if the side hinge oven doors are properly aligned. The door should pull itself closed smoothly when the striker engages the roller as the door is closed. 2. Too high (Fig. A - door needs to move down on latch side) you will feel interference between the striker and the catch receiver. 3. Too low (Fig. B - door needs to move up on latch side) you will feel a bump when the striker comes into contact with the realignment roller. Hint: The gap between the top of the closed oven door and the control panel (or upper door for lower cavities in double ovens) should be fairly uniform from side to side. Side Hinge Door Alignment Procedure 1. Open the door to approximately 135°. 2. Using a Torx T-20 starhead screwdriver, loosen the 3 screws (A) on the lower hinge by 1 to 2 full turns. Note: All adjustment is made with the lower hinge only. The upper hinge is fixed in place and cannot be adjusted. 3. Using a #2 philips head screwdriver, turn the cam (B) right or left to adjust the hinge position in the desired direction. Note: 1mm of hinge movement (left or right) will move the door up or down approximately 1.5mm at the door catch. 4. Re-tighten the screws before closing the door to test. Be careful not to overtighten. 5. Check for proper door alignment. Repeat adjustment procedure as necessary. English 4
-
 1
1 -
 2
2 -
 3
3 -
 4
4 -
 5
5 -
 6
6 -
 7
7 -
 8
8 -
 9
9 -
 10
10 -
 11
11 -
12
-
13
-
14
-
15
-
16
-
17
-
18
-
19
-
20
 |
 |
