Bosch HES7152U Use & Care Manual - Page 40
The Oven - reviews
 |
UPC - 825225842446
View all Bosch HES7152U manuals
Add to My Manuals
Save this manual to your list of manuals |
Page 40 highlights
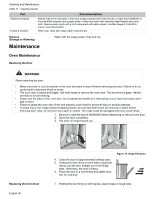
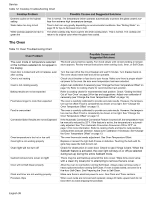
Service Table 12: Cooktop Troubleshooting Chart Cooktop Problem Element cycles on the highest setting Water takes too long to boil White cooktop appears to have a green tint Possible Causes and Suggested Solutions This is normal. The temperature limiter operates automatically to protect the glass ceramic surface from extreme high temperature damage. Time to boil can vary greatly depending on environmental conditions. See "Boiling Water" on page 22 for tips to decrease time to boil. The white cooktop may have a green tint while cooling down. This is normal. The cooktop will return to its original color when the glass has cooled. The Oven Table 13: Oven Troubleshooting Chart Oven Problem The oven mode or temperature selected or the numbers selected do not appear in the display Oven door is locked and will not release, even after cooling Oven is not heating Oven is not cooking evenly Baking results are not as expected Food takes longer to cook than expected Food is overcooked Convection Bake Results are not as Expected Oven temperature is too hot or too cold Oven light is not working properly Oven light will not turn off Cannot remove lens cover on light Oven will not Self-Clean properly Clock and timer are not working properly Porcelain chips Possible Causes and Suggested Solutions The knob was turned too rapidly. Turn knob slower until correct wording or temperature appears. Review manual instructions when setting clock, timer, or Self-Clean. Turn the oven off at the circuit breaker and wait 5 minutes. Turn breaker back on. The oven should reset itself and will be operable. Check circuit breaker or fuse box to your house. Make sure there is proper electrical power to the oven. Be sure oven temperature has been selected. Adjust oven calibration if necessary (see "Change the Oven Temperature Offset" on page 13). Refer to cooking charts for recommended rack position. Refer to cooking charts for recommended rack position. Check "Getting the Most Out of Your Oven" on page 24 for tips and suggestions. Adjust oven calibration if necessary (see "Change the Oven Temperature Offset" on page 13). The oven is carefully calibrated to provide accurate results. However, the temperature can be offset if food is consistently too brown or too light. See "Change the Oven Temperature Offset" on page 13. The oven is carefully calibrated to provide accurate results. However, the temperature can be offset if food is consistently too brown or too light. See "Change the Oven Temperature Offset" on page 13. If the Automatic Convection Conversion Feature is turned off, the temperature must be manually reduced by 25°F. If the feature is active, the temperature is automatically adjusted. See "Turn Automatic Convection Conversion ON or OFF" on page 14 for more information. Refer to cooking charts and tips for rack positions, cooking times and pan selection. Adjust oven calibration if necessary. See"Change the Oven Temperature Offset" on page 13. The oven thermostat needs adjustment. See Oven Temperature Offset. Replace or reinsert the light bulb if loose or defective. Touching the bulb with fingers may cause the bulb to burn out. Check for obstruction in oven door. Check to see if hinge is bent. When the Sabbath feature is activated, the oven light will stay on or off (as selected during set-up) during the entire Sabbath mode. There may be soil build-up around the lens cover. Wipe lens cover area with a clean dry towel prior to attempting to remove the lens cover. Allow the oven to cool before running Self-Clean. Always wipe out loose soils or heavy spillovers before running Self-Clean. If oven is badly soiled, set oven for a five-hour Self-Clean. See Preparing the Oven to Self-Clean. Make sure there is electrical power to oven. See Clock and Timer sections. When oven racks are removed and replaced, always tilt racks upward and do not force them to avoid chipping the porcelain. English 38
-
 1
1 -
2
-
3
-
4
-
5
-
6
-
7
-
8
-
9
-
10
-
11
-
12
-
13
-
14
-
15
-
16
-
17
-
18
-
19
-
20
-
21
-
22
-
23
-
24
-
25
-
26
-
27
-
28
-
29
-
30
-
31
-
32
-
33
-
34
-
 35
35 -
 36
36 -
 37
37 -
 38
38 -
 39
39 -
 40
40 -
 41
41 -
 42
42 -
 43
43 -
 44
44 -
 45
45 -
46
-
47
-
48
-
49
-
50
-
51
-
52
-
53
-
54
-
55
-
56
-
57
-
58
-
59
-
60
-
61
-
62
-
63
-
64
-
65
-
66
-
67
-
68
-
69
-
70
-
71
-
72
-
73
-
74
-
75
-
76
-
77
-
78
-
79
-
80
-
81
-
82
-
83
-
84
-
85
-
86
-
87
-
88
-
89
-
90
-
91
-
92
-
93
-
94
-
95
-
96
-
97
-
98
-
99
-
100
-
101
-
102
-
103
-
104
-
105
-
106
-
107
-
108
-
109
-
110
-
111
-
112
-
113
-
114
-
115
-
116
-
117
-
118
-
119
-
120
-
121
-
122
-
123
-
124
-
125
-
126
-
127
-
128
 |
 |
