Bosch HGS3023UC Instructions for Use - Page 28
Service
 |
UPC - 825225880370
View all Bosch HGS3023UC manuals
Add to My Manuals
Save this manual to your list of manuals |
Page 28 highlights
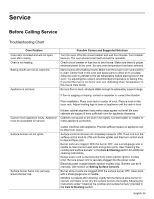
Service Before Calling Service Troubleshooting Chart Oven Problem Oven door is locked and will not open, even after cooling. Oven is not heating. Baking results are not as expected. Appliance is not level. Possible Causes and Suggested Solutions Turn the oven off at the circuit breaker and wait five minutes. Turn breaker back on. The oven should reset itself and will be operable. Check circuit breaker or fuse box to your house. Make sure there is proper electrical power to the oven. Be sure oven temperature has been selected. Many factors affect baking results. Make sure the proper oven rack position is used. Center food in the oven and space pans to allow air to circulate. Allow the oven to preheat to the set temperature before placing food in the oven. Try adjusting the recipe's recommended temperature or baking time. If you feel the oven is too hot or cool, see "Adjusting Oven Temperature" in this Use & Care Guide. Be sure floor is level, strong & stable enough to adequately support range. If floor is sagging or sloping, contact a carpenter to correct the situation. Poor installation. Place oven rack in center of oven. Place a level on the oven rack. Adjust leveling legs at base of appliance until the rack is level. Cannot move appliance easily. Appliance must be accessible for service. Kitchen cabinet alignment may make range appear not level. Be sure cabinets are square & have sufficient room for appliance clearance. Cabinets not square or are built in too tightly. Contact builder or installer to make appliance accessible. Surface burners do not ignite. Surface burner flame only part way around burner cap. Carpet interferes with appliance. Provide sufficient space so appliance can be lifted over carpet. Surface control knob was not completely turned to LITE. Push in & turn the surface control knob to LITE until burner ignites and then turn control knob to desired flame size. Burner ports are clogged. With the burner OFF, use a small-gauge wire or needle to clean burner head slots and ignition ports. See "Cleaning the cooktop and surface burners" in the Care & Cleaning section for additional cleaning instructions. Range power cord is disconnected from outlet (electric ignition models only). Be sure power cord is securely plugged into the power outlet. Electrical power outage (electric ignition models only). Burners can be lit manually. See section on Setting Surface Controls. Burner slots or ports are clogged. With the surface burner OFF, clean ports with a small-gauge wire or needle. Moisture is present after cleaning. Lightly fan the flame & allow burner to operate until flame is full. Dry the surface burners thoroughly following the instructions under "Cleaning the cooktop and surface burners" provided in the Care & Cleaning section. English 25
-
 1
1 -
2
-
3
-
4
-
5
-
6
-
7
-
8
-
9
-
10
-
11
-
12
-
13
-
14
-
15
-
16
-
17
-
18
-
19
-
20
-
21
-
22
-
 23
23 -
 24
24 -
 25
25 -
 26
26 -
 27
27 -
 28
28 -
 29
29 -
 30
30 -
 31
31 -
 32
32 -
 33
33 -
34
-
35
-
36
-
37
-
38
-
39
-
40
-
41
-
42
-
43
-
44
-
45
-
46
-
47
-
48
-
49
-
50
-
51
-
52
-
53
-
54
-
55
-
56
-
57
-
58
-
59
-
60
-
61
-
62
-
63
-
64
-
65
-
66
-
67
-
68
-
69
-
70
-
71
-
72
-
73
-
74
-
75
-
76
-
77
-
78
-
79
-
80
-
81
-
82
-
83
-
84
-
85
-
86
-
87
-
88
-
89
-
90
-
91
-
92
-
93
-
94
-
95
-
96
 |
 |
